Introduction
The hydraulic pump is the heart of your excavator's hydraulic system. Without it functioning properly, your machine cannot dig, lift, or swing—making pump failure one of the most costly forms of downtime on any job site. When your excavator sits idle, project deadlines slip and revenue evaporates.
Hydraulic pump problems follow predictable patterns. The most common culprits are wear on internal components, oil contamination, seal failure, and cavitation. Over 75% of all hydraulic system failures are directly caused by contamination, according to Parker Hannifin.
Most of these issues can be addressed before full pump failure — if you catch them early enough.
This guide walks through the most common failure symptoms, how to diagnose the root cause, a step-by-step repair process, and when it makes more sense to replace, rebuild, or exchange the pump rather than repair it.
Key Takeaways
- Most excavator hydraulic pump failures give clear warning signals: low pressure, external leaks, overheating, and cavitation noise
- Early-stage damage is repairable—complete internal failure or severe wear typically warrants replacement or a rebuilt exchange unit
- Successful repair depends on diagnosing the root cause first, then applying the right fix and verifying results under load
- Extensive internal damage or uncertain diagnosis? A professional rebuild service gets you back running faster than field repairs
What Is an Excavator Hydraulic Pump?
The excavator hydraulic pump converts mechanical energy from the engine into hydraulic flow, pressurizing fluid to power the boom, arm, bucket, swing, and travel functions. In practical terms, it's a variable-displacement axial piston pump—the dominant design in modern excavators—that delivers precise flow control under extreme pressure.
Most excavators use a tandem piston pump configuration: a single shaft drives two pump sections, eliminating the need for a power divider and increasing transmission efficiency. Failure in one section affects the entire hydraulic circuit, which is why early diagnosis matters. Other designs exist across the equipment spectrum:
- Axial piston pumps — standard on mid-size to large modern excavators
- Gear pumps — common in older or smaller machines, simpler but less efficient
- Vane pumps — found in select older equipment, limited to lower-pressure applications
The pump is a high-precision component that degrades gradually. Internal clearances widen with use, efficiency drops, and you'll start noticing sluggish movements or pressure loss during operation. Catching those signs early is the difference between a rebuild and a full replacement.
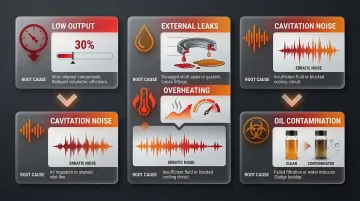
Common Problems and Warning Signs
Most hydraulic pump failures give clear warning signals before catastrophic failure. Operators who learn to recognize these signs can act early and reduce both repair complexity and downtime.
Low Output / Weak Machine Performance
Watch for these signs:
- Excavator feels sluggish under load
- Bucket or boom moves slower than normal
- Machine struggles to complete full cycles
- Relief valves chatter during operation
Root causes typically include:
- Worn pistons, cylinder block, or valve plate causing internal bypass leakage
- Blocked suction filter starving the pump of flow
- Incorrect hydraulic oil viscosity for operating conditions
External Hydraulic Leaks
Symptoms:
- Visible oil around the pump housing, shaft, or hose connections
- Oil pooling under the machine
- Gradual drop in reservoir level without apparent cause
Likely causes:
- Degraded shaft seal (common after high-hour use or heat cycles)
- Damaged O-rings at port connections
- Cracked pump housing from impact or over-pressure event
Overheating
Symptoms:
- Hydraulic oil temperature gauge running above normal range
- Oil smells burnt
- Performance drops progressively during long work cycles
- Oil breaks down and darkens quickly
Likely causes:
- Low oil level causing reduced lubrication
- Contaminated or aged oil with degraded viscosity
- Blocked oil cooler or cooling circuit
- Pump operating under continuous overload beyond rated capacity
Cavitation Noise
Symptoms:
- Loud whining or knocking sound from the pump during operation
- Noise typically worsens under load or at high RPM
- May be accompanied by erratic pressure or output
Common sounds include whining, knocking, or screeching — each pointing toward restricted inlet flow or air ingestion.
Likely causes:
- Clogged suction filter restricting oil inlet flow
- Air entering through a loose or cracked suction hose
- Oil level too low
- Incorrect oil viscosity causing poor flow at suction
Cavitation Noise
Symptoms:
- Loud whining, knocking, or screeching from the pump during operation
- Noise worsens under load or at high RPM
- May be accompanied by erratic pressure or output
Likely causes:
- Clogged suction filter restricting oil inlet flow
- Air entering through a loose or cracked suction hose
- Oil level too low
- Incorrect oil viscosity causing poor flow at suction
Cavitation and contamination are closely related — restricted flow accelerates wear, and wear generates the particles that show up in the next warning sign.
Oil Contamination
Symptoms:
- Hydraulic oil appears milky, foamy, or visibly dark and gritty
- Filter elements show metallic debris or sludge
- Unusual wear on multiple hydraulic components simultaneously
Likely causes:
- Failed breather or reservoir cap allowing moisture ingress
- Internal component wear generating metallic particles
- Incorrect oil type introduced during service
- Infrequent oil and filter changes allowing oxidation and varnish buildup
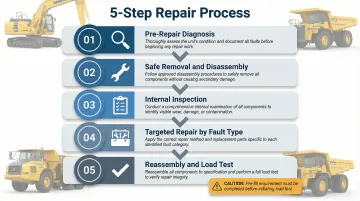
How to Repair Your Excavator Hydraulic Pump: Step-by-Step
Attempting a repair without first isolating the root cause almost always leads to repeat failures. The steps below ensure you fix the correct problem the first time.
Step 1: Perform a Thorough Pre-Repair Diagnosis
Check hydraulic oil level and condition first. Many symptoms—cavitation, overheating, low output—trace back to oil issues that don't require pump disassembly. Note the oil's color, smell, and any visible contamination.
Before touching the pump, inspect all external components:
- Suction filter condition
- Hoses and fittings for leaks or blockages
- Pump drive coupling integrity
- Engine RPM delivered to the pump
Then run a pressure and flow test using a hydraulic test gauge at the pump outlet. This measures actual output against manufacturer specifications and confirms whether the pump is the fault or the problem is downstream.
Step 2: Remove and Disassemble the Pump Safely
Relieve all system pressure before disconnecting any hydraulic lines. Drain the relevant circuit, cap all open ports immediately to prevent contamination, and clean the pump exterior thoroughly before starting.
Work from a manufacturer-specific service manual in a clean environment. Photograph each assembly stage, note component orientation, and organize parts in removal order—this makes reassembly significantly faster and reduces errors.
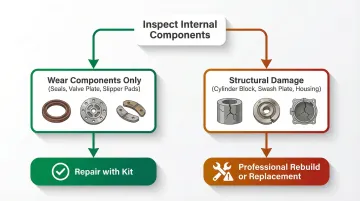
Step 3: Inspect Internal Components and Identify Damage
Inspect the cylinder block, pistons, slipper pads, valve plate, swash plate, and shaft bearing as a set. Look for:
- Scoring or pitting on mating surfaces
- Uneven wear patterns
- Out-of-tolerance clearances (check with micrometers and feeler gauges)
Check the shaft seal and all O-rings for hardening, cracking, or deformation. Seal failure is often heat-driven—if seals are degraded, find out why the pump ran hot before replacing anything.
The key question at this stage: is the damage limited to wear components (seals, valve plate, slipper pads) or has it reached structural parts like the cylinder block, swash plate, or housing? Wear components can usually be addressed with a repair kit. Structural damage means the pump needs professional rebuild or outright replacement.
Step 4: Repair Based on Identified Fault
For seal and O-ring failures:
- Install a complete OEM or manufacturer-equivalent seal kit
- Never replace individual seals in isolation
- Confirm all mating surfaces are clean and undamaged before fitting new seals
- Torque all fasteners to specification
For valve plate and slipper pad wear:
- Replace worn valve plates and slipper pads as a matched set
- Lightly lap the cylinder block face on a precision surface plate if minor scoring is present
- If scoring is deep, the block requires professional resurfacing or replacement
For cavitation damage (pitted pistons or block):
- Replace all affected components
- Address the root cause (suction restriction, air ingress) before reassembly or the same damage will recur within hours
For contamination-related wear:
- Flush the entire hydraulic circuit—reservoir, lines, and cooler—before reinstalling a repaired or replacement pump
- Installing a clean pump into a contaminated system will destroy it rapidly
Step 5: Reassemble, Refill, and Test
Reassemble the pump per service manual torque specifications. Pre-fill the pump housing with clean hydraulic oil before installation—this prevents dry-start scoring on first startup.
Once installed, follow this startup sequence:
- Start the engine and run at low idle with no load for several minutes
- Gradually increase RPM and load while monitoring for abnormal noise or heat
- Confirm output pressure and flow match manufacturer specs under both normal and peak load
- Complete one full work cycle and watch for any return of the original symptom before returning the machine to service
Even a well-executed repair can fail if these common mistakes aren't avoided:
Common Mistakes to Avoid During Repair
- Skipping the pressure/flow test: Guessing at the root cause leads to unnecessary disassembly and missed diagnoses
- Using non-OEM seal kits: Wrong durometer or material ratings cause rapid failure under operating pressure and temperature—hydraulic seals are specification-critical
- Reinstalling into an uncleaned system: Contamination left in the circuit will destroy a rebuilt pump within hours
- Skipping the pre-fill: Running a piston pump dry even briefly scores precision surfaces permanently
Fix vs. Replace: How to Make the Right Call
The decision hinges on three factors: the cost of repair versus replacement, the risk of repeat failure, and the impact of extended downtime on operations. Getting this call wrong in either direction is expensive.
Scenario 1: Repair Makes Sense
Repair is the right move when:
- Damage is limited to wear items — seals, O-rings, valve plate, and slipper pads — that fall within a standard rebuild kit. Repair cost is a fraction of replacement, and the core pump components remain serviceable.
- The pump has relatively low hours and structural components (cylinder block, housing, swash plate) show no scoring or dimensional damage. A well-executed rebuild at this stage extends pump life significantly.
Scenario 2: Replacement or Professional Rebuild Is the Better Option
Replace or pursue a professional rebuild when:
- Cylinder blocks, housings, or swash plates show deep scoring, cracking, or are out of tolerance — field repairs to these components rarely restore full efficiency and often fail again quickly
- The pump has very high operating hours and multiple internal components are worn simultaneously
- The cumulative cost of sourcing and fitting individual components exceeds the cost of a quality exchange unit
- Minimizing downtime is the priority and waiting on an in-field repair isn't practical
For time-critical situations, Hydrostatic Transmission Service offers a Short-Time exchange program: a tested, warranted rebuilt unit ready to install while your core is rebuilt to OEM specifications. All exchange units carry a 1-year warranty.
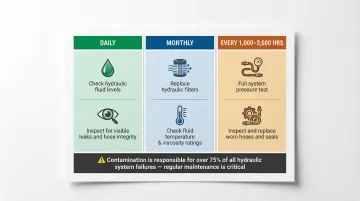
Preventive Maintenance to Avoid Future Failures
Most excavator hydraulic pump failures are preventable through consistent maintenance. Over 75% of hydraulic system failures are linked to contamination or poor maintenance practices, according to industry research.
Core preventive actions:
- Check hydraulic oil level and condition daily before operation
- Change hydraulic oil and all filters at manufacturer-recommended intervals (typically every 1,000–2,000 hours depending on operating conditions)
- Use the manufacturer-specified oil viscosity grade for the operating temperature range
- Inspect suction hoses and fittings for air ingress monthly
- Keep the pump exterior clean to aid heat dissipation and early leak detection
Beyond these actions, keep records of pump operating hours, oil change dates, and any unusual performance events. This paper trail enables early intervention before small issues escalate. Abnormal noise or output loss caught early is a minor repair—left unaddressed, the same problem becomes a full pump failure.
Frequently Asked Questions
How much does it cost to repair a hydraulic pump on an excavator?
Repair costs vary based on damage severity, pump type, and repair method. A seal kit repair may cost a few hundred dollars; a full professional rebuild typically runs $2,000–$5,000 or more. Exchange programs can reduce both cost and downtime compared to a full in-shop rebuild.
Can hydraulic pumps be repaired?
Yes, in most cases—particularly when damage is caught early and limited to wear components like seals, valve plates, and slipper pads. Severe damage to structural parts such as cylinder blocks or housings generally requires a professional rebuild or full replacement.
How do I know if my hydraulic pump is bad in my excavator?
Common indicators include:
- Sluggish or weak machine performance
- Unusual whining or knocking sounds from the pump
- Visible leaks around the pump housing or shaft
- Overheating hydraulic oil
- Low pressure confirmed by a gauge test at the pump outlet
What is the most common cause of hydraulic pump failure in excavators?
Oil contamination and cavitation—caused by clogged suction filters or low oil levels—are among the leading causes of premature pump failure, alongside normal wear from high operating hours. Solid particles account for 60–70% of total failures. They act as a lapping compound within tight internal tolerances, accelerating wear far beyond normal rates.
How long does it take to repair an excavator hydraulic pump?
A field seal replacement typically takes a few hours. A full internal rebuild runs one to several days, depending on parts availability and damage extent. Exchange programs eliminate rebuild lead time entirely by providing a ready-to-install unit.
What type of hydraulic pump does an excavator use?
Most modern excavators use a variable-displacement axial piston pump, often in a tandem configuration where two pump sections share a single drive shaft. Older or smaller machines may use gear or vane pumps. Pump type affects repair complexity and parts availability significantly.