Introduction
Hydraulic vane pumps handle demanding work across industrial manufacturing, construction, and mobile hydraulic systems — prized for quiet operation, high efficiency, and consistent flow delivery. Despite that reliability, they fail in predictable ways.
The most common failures include shaft seal leaks, cartridge kit wear, cam ring rippling, burned pressure plates, and hardened seals. Left unaddressed, these problems escalate fast — driving costly downtime and secondary system damage. Most vane pump failures are repairable, and catching them early is what keeps a minor repair from becoming a full replacement.
This guide covers the most common hydraulic vane pump problems, step-by-step repair procedures, how to decide between fixing or replacing, and when to call in a specialist.
Key Takeaways
- The most common vane pump failures are shaft seal leaks, cartridge kit wear, cam ring rippling, burned pressure plates, and hardened seals
- Replacing the vane cartridge kit restores most pumps to original efficiency—full replacement is rarely necessary
- Diagnose first: noise, heat buildup, flow loss, and visible leaks each point to specific failure modes before you disassemble anything
- Rebuild instead of replace unless internal damage is severe, failures keep repeating, or rebuild costs approach the price of a replacement unit
- A professional rebuild backed by a 1-year warranty and a short-time exchange program gets equipment back online faster than waiting on new parts
What Is a Hydraulic Vane Pump?
A hydraulic vane pump is a positive displacement device that moves fluid by trapping it between spring-loaded or hydrostatically balanced vanes and an oval-shaped cam ring. As the rotor spins, vanes extend outward from slots in the rotor, maintaining continuous contact with the cam ring's inner surface to create expanding inlet chambers and collapsing outlet chambers.
Both fixed and variable displacement vane pumps share the same fundamental rotating group:
- Rotor — the driven shaft component housing the vane slots
- Vanes — spring-loaded or pressure-balanced blades that seal against the cam ring
- Cam ring — the oval inner surface that creates the pumping action
- Sideplates — the end faces that seal the rotating assembly
Variable displacement models add a pressure compensator to adjust flow, but the core mechanical components and failure modes remain the same — so troubleshooting approaches apply equally to both types.
Because these components share the same design, vane pumps follow a predictable wear pattern: they maintain high efficiency throughout most of their service life, then degrade quickly once wear thresholds are crossed. Catching that transition early — through flow testing or pressure drop monitoring — is what separates a planned rebuild from an emergency failure.
Common Hydraulic Vane Pump Problems
Most vane pump failures follow recognizable patterns and produce clear symptoms. Understanding these patterns separates a fast, accurate diagnosis from a costly guessing game.
Shaft Seal Leak
Symptoms:
- Visible hydraulic fluid dripping or pooling at the front end of the pump
- Oily film around the shaft area
Likely causes:
Shaft seal leaks stem from three root causes:
- Bearing failure that allows shaft movement to abrade the seal
- Seal hardening caused by prolonged overheating—typically above 150°F (65°C) for standard NBR (Nitrile) seals
- External contamination embedding in the rubber seal and cutting a groove into the shaft sealing surface over time
Mechanical misalignment and unbalanced couplings induce radial play that physically abrades shaft seals and causes fretting corrosion.
Cam Ring Rippling and Cartridge Kit Failure
Symptoms:
- Loud noise under pressure combined with noticeable reduction in flow output
- This noise is distinct from cavitation—cartridge failure produces a grinding or rubbing sound as particles score metal surfaces, while cavitation sounds like gravel or "marbles rattling in a can"
Likely causes:
- Worn or fatigued cam ring surface from extended operation
- Abrasive contamination in the fluid
- Running beyond recommended service intervals without cartridge replacement
When inlet vacuum exceeds design limits, hydrostatically balanced vanes lose balance and bounce against the cam ring, creating visible "ripple" wear patterns on the cam profile. Particles larger than half the clearance between the rotor and cam ring cause catastrophic seizure.

Burned or Scored Pressure Plates and Rotor
Symptoms:
- Severe loss of pressure and flow
- Discolored or scored internal surfaces visible on disassembly
- Pump may have run hot with little warning
Likely causes:
- Running the pump dry (insufficient fluid at startup or after maintenance)
- Abrasive contamination causing rapid heat buildup in the rotating group
Without fluid, the microscopic oil film between the rotor and sideplates breaks, replacing lubricity with dry metal-to-metal friction that generates extreme localized heat. The result: heat discoloration and metal seizure between contact surfaces.
Hardened Seals
Symptoms:
- External leaks at multiple points
- Stiff or cracked seal material on inspection
- Pump may have appeared to run normally before sudden failure
Likely causes:
Extended operation above safe temperature thresholds causes elastomer seals to lose flexibility and crack. The mechanism is thermal oxidation: high temperatures and oxygen cause irreversible degradation of seal properties, including formation of new crosslink sites that eliminate elasticity.
Heat also causes plasticizers and other compound components to dissolve, leach out, or evaporate—resulting in shrinkage and embrittlement. For standard NBR seals, Eaton recommends an optimal operating temperature of 120°F (49°C) and a maximum of 150°F (65°C). Exceeding these limits always reduces service life.
Cavitation
Symptoms:
- Growling or rattling noise from the pump—sounds like gravel or "marbles in a can"
- Milky or aerated fluid appearance
- Erratic pressure output
- Elevated fluid temperature
Likely causes:
Cavitation occurs when high vacuum creates vapor bubbles within the oil at the pump inlet, which then collapse violently on the discharge side. Common causes include:
- Restricted inlet line
- Clogged suction strainer
- Fluid viscosity too high for operating temperature
- Insufficient fluid level in the reservoir
- Exceeding the maximum inlet vacuum limit of 5 in. Hg (0.17 bar) for petroleum oils
Left unchecked, cavitation causes erosion craters, pitting, and "black marks" on port plates and vane tips—damage that compounds quickly once it starts.
How to Fix a Hydraulic Vane Pump: Step-by-Step
Attempting to repair a vane pump without first confirming the problem and its root cause leads to wasted parts, repeat failures, and unnecessary downtime. The four steps below ensure the right fix is applied the first time.
Step 1: Identify the Exact Problem
Check for visible symptoms before disassembly:
- Inspect for external leaks at the shaft and port connections
- Listen for unusual noise—distinguish between high-pitched whine, growling, or banging under load
- Feel the outlet pressure line for excessive heat or irregular fluid pulsation
Measure system performance:
- Note any reduction in flow rate
- Document loss of system pressure
- Check for sluggish actuator response
- Record whether symptoms occur at startup, under load, or continuously
This narrows the fault to specific components.
Step 2: Confirm the Root Cause
Determine whether the issue is internal to the vane pump (worn cartridge, shaft seal failure, cam ring damage) or system-level (contaminated fluid, restricted inlet, overheating reservoir). Treating a system-level cause with a pump repair alone will result in repeat failure.
Rule out external factors before disassembly:
- Check fluid level
- Inspect fluid condition (color, viscosity, contamination)
- Verify inlet line is not restricted
- Check filter condition
- Measure operating temperature
If these are the source, they must be corrected as part of the repair, not after.
Step 3: Fix Based on the Identified Problem
The repair action depends entirely on what failed. Vane pumps are well-suited to in-field repair: the entire rotating group (vanes, rotor, cam ring, and pressure plates) can be replaced as a single cartridge kit, bringing the pump back to original output.
If the Vane Cartridge or Cam Ring Is Worn
Cartridge replacement procedure:
- Safely shut down and depressurize the system
- Drain the pump
- Remove the pump from the circuit following the manufacturer's disassembly sequence
- Inspect the housing for scoring or cracks
- Install the new cartridge kit (vanes, rotor, cam ring, and side plates) using correct torque specs
- Reassemble and reinstall
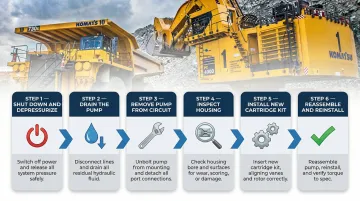
Use OEM or manufacturer-approved cartridge kits to ensure correct vane dimensions and cam ring geometry. Aftermarket kits with incorrect tolerances (even 0.0002") will cause premature failure. Vane pump cartridges must be replaced as a complete kit; individual parts are not interchangeable.
If the Shaft Seal Is Leaking
Seal replacement process:
- Remove the pump
- Support the shaft
- Press out the old shaft seal
- Inspect the shaft surface for grooves or corrosion (a grooved shaft requires shaft repair or replacement before a new seal will hold)
- Press in the new seal to the correct depth
- Verify alignment before reinstalling
If overheating caused the seal failure, correct the underlying thermal issue (low fluid, blocked cooler, incorrect viscosity) before reinstallation. Skip that step and the new seal will fail just as fast.
If the Pump Has Burned Pressure Plates or a Scored Rotor
Burned or heavily scored internal components require more than a cartridge kit. The housing and shaft may also need inspection and replacement, making this a full rebuild.
For this level of internal damage, a professional hydraulic pump rebuild service is often the right call. Hydrostatic Transmission Service rebuilds and tests units to manufacturer specifications using a Statistical Process Control system, with a 1-year warranty on all rebuilds.
If Cavitation Is the Root Cause
Address the system-side causes first:
- Clean or replace the suction strainer
- Inspect the inlet line for kinks or restrictions
- Verify fluid level and viscosity are within the manufacturer's specification for the operating temperature range
Only after correcting the inlet conditions should the pump internals be inspected. If cavitation has been occurring for an extended period, the cam ring and vane tips will show characteristic pitting and erosion that requires cartridge replacement.
Step 4: Test and Validate the Fix
With the repair complete, priming correctly before startup is as important as the repair itself. Do not dry-start the pump. Seal and bearing damage can begin within seconds, and there is no safe window for dry running.
Safe priming procedure:
- Fill the pump housing with filtered system fluid through the uppermost outlet port before starting
- Place all controls in the neutral position and back off the pressure relief valve to minimum setting
- Loosen an outlet connection or use an air bleed valve to allow trapped air to escape until a solid stream of fluid appears
- Manually rotate the shaft to verify freedom of the cartridge before applying power
Run the system at low pressure initially before gradually loading to full operating pressure. Monitor outlet flow, system pressure, operating temperature, and noise level over the first operating hours. Confirm that the original symptoms have resolved and that no new leaks, noise, or thermal issues have developed before returning the equipment to full service.
Fix vs. Replace: How to Decide
The fix-vs.-replace decision for hydraulic vane pumps hinges on three factors: the extent of internal damage, the cost of repair versus a new or rebuilt unit, and the criticality of the equipment's uptime.
Fix the pump when:
- The failure is isolated to the cartridge kit or shaft seal (the most common scenarios)
- The housing and shaft are undamaged
- The pump has not been run dry or severely contaminated
- Cartridge replacement costs a fraction of a new unit and can often be completed in a single shift
Replace or exchange the pump when:
- The housing is cracked or heavily scored
- The shaft is grooved beyond seal tolerance
- The pump has experienced repeated failures in a short period
- Repair cost approaches or exceeds the cost of a rebuilt unit
When repair no longer makes sense, a pump exchange program is often the fastest path back to production. Hydrostatic Transmission Service's Short-Time exchange program provides warranty-backed rebuilt units that ship quickly, cutting downtime without the lead time of a full custom rebuild.
Preventive Maintenance and Mistakes to Avoid
Maintain Fluid Cleanliness
Fluid contamination is the single most impactful preventive measure. OEM data confirms that 80% of hydraulic vane pump failures are linked to fluid contamination incidents. Particles larger than half the clearance between the rotor and cam ring cause catastrophic seizure.
Recommended ISO 4406 cleanliness codes:
| System Pressure | Fixed Vane Pump | Variable Vane Pump |
|---|---|---|
| < 1000 psi | 20/18/15 | 18/16/14 |
| 1000-3000 psi | 19/17/14 | 17/15/13 |
| 3000+ psi | 18/16/13 | 17/15/13 |
Change filters and fluid on a fixed schedule. For an 8-hour-per-day system running under 2000 psi targeting ISO 17/15/12, that means roughly every 4 months.
Monitor and Control Operating Temperature
Three checks keep operating temperatures in range:
- Check fluid levels regularly to prevent cavitation-induced heat buildup
- Inspect cooling systems and heat exchangers for fouling or blockage
- Match the fluid viscosity grade to your operating temperature (recommended range: 13–54 cSt / 70–250 SUS for petroleum oil; optimum 32–48 cSt at 100°F / 38°C)
Sustained operation above 150°F (65°C) degrades seals and shortens cartridge life. Keep temperatures below that threshold.
Schedule Cartridge Inspections at Regular Intervals
Because vane pumps maintain their efficiency until they fail rather than degrading gradually, proactive cartridge inspection (or replacement based on operating hours) is the most effective way to prevent unplanned downtime. Under optimal conditions, vane pumps can achieve 12,000 to 18,000 operating hours before requiring cartridge replacement.
Avoid the Most Common Repair Mistakes
Three errors account for most repeat failures after a vane pump repair:
- Replacing the cartridge without fixing the root cause — contamination, cavitation, or overheating will fail the new kit just as fast
- Dry-starting after reassembly instead of priming the pump before startup
- Using non-OEM cartridge kits with incorrect tolerances that accelerate wear from the first hour of operation
Correct the underlying system condition before reinstalling any components.
Frequently Asked Questions
What is the life expectancy of a vane pump?
Vane pump life expectancy depends heavily on fluid cleanliness, operating temperature, and maintenance frequency. Under optimal conditions, expect 12,000 to 18,000 operating hours (roughly 6 to 9 years). Unlike many components that degrade gradually, vane pumps tend to hold efficiency until failure — so proactive maintenance matters more than reactive monitoring.
Can a hydraulic pump be repaired?
Yes, hydraulic vane pumps are among the most repairable pump types. The standard repair involves replacing the vane cartridge kit (vanes, rotor, cam ring, and side plates), which typically restores the pump to its original operating efficiency without replacing the entire unit.
What are the symptoms of a failing hydraulic vane pump?
The most common warning signs include shaft seal leaks, loud noise under pressure, reduced flow or pressure output, excessive fluid temperature, and aerated or milky fluid. Catching these early prevents more costly internal damage.
How do I know if my vane pump needs a new cartridge kit?
Loud noise under pressure combined with reduced flow is the most reliable indicator of cartridge kit failure. During disassembly, check the cam ring for rippling, vane tips for wear, and pressure plates for scoring — any of these confirms a cartridge kit replacement is needed.
What causes a hydraulic vane pump to run dry, and how can it be prevented?
Dry running occurs when the pump starts without adequate fluid, most often after maintenance, a system drain, or low reservoir level. Always prime the pump before startup and verify fluid level before commissioning following any repair.
Does a variable displacement vane pump fail differently than a fixed displacement model?
Both types share the same fundamental rotating group and experience the same failure modes—cartridge wear, shaft seal leaks, and overheating. Variable displacement models add the possibility of compensator-related issues (such as spool sticking or blocked orifices) but require the same core troubleshooting approach.