Introduction
Piston pumps are the heart of hydraulic systems in heavy machinery—from construction equipment and agricultural machines to industrial systems—where unplanned failure means costly downtime. Heavy equipment downtime averages $740 per hour in lost productivity, making pump reliability critical to the bottom line.
Rebuilding a piston pump can restore performance to near-manufacturer specifications at a fraction of replacement cost. Outcomes depend heavily on inspection depth, dimensional tolerances, cleanliness practices, and parts quality. A well-executed rebuild extends pump life by thousands of hours. Cut corners, and you risk a premature failure that costs more than the original repair.
This guide walks through the full rebuild process, covering:
- Pre-rebuild preparation and required tools
- Step-by-step disassembly, inspection, and reassembly
- Critical quality parameters and tolerances
- Common mistakes that cause premature failure
- When a professional exchange service is the better option
Key Takeaways
- A successful rebuild requires full disassembly, measurement against manufacturer specs, replacement of all wearable parts, and pressure-tested commissioning
- Most rebuild failures stem from contamination introduced during rebuild, skipped dimensional measurements, and reuse of worn components that appear serviceable
- Always use a model-specific rebuild kit—generic kits risk part incompatibility and premature failure
- Verify all component clearances against manufacturer tolerances before reassembly—do not skip this step
- For critical downtime situations, a warranted exchange unit is often faster and lower-risk than an in-house rebuild
What You Need Before Rebuilding Your Piston Pump
An inadequate workspace, missing tools, or wrong parts will compromise rebuild quality regardless of technical skill. Get these sorted before you start.
Tools and Equipment
Essential tools required for a successful rebuild:
- Calibrated torque wrench (ISO 6789:2017 compliant for accurate fastener torque)
- Outside micrometer and dial indicator for clearance measurements
- Snap ring pliers for retaining ring removal
- Bearing puller and press for bearing extraction and installation
- Soft-jaw vise to secure components without damage
- Clean bench with lint-free work surface to prevent contamination
- Hydraulic test bench or pressure gauge setup for post-rebuild verification
Torque wrench calibration to ISO 6789:2017 standards ensures accurate assembly torques—improper torque is one of the most common causes of post-rebuild failure.
Parts, Materials, and Documentation
A model-specific rebuild kit is non-negotiable. It should include:
- All O-rings matched to pump model
- Shaft seals
- Piston packing and seals
- High-wear components (valve plates, pistons, bearings)
Obtain the manufacturer's service manual for torque specs and clearance tolerances before starting. Generic kits risk part incompatibility that leads to leaks, pressure loss, and premature failure.
Safety and System Readiness
Before disassembly:
- Fully depressurize and drain the hydraulic system
- Physically remove the pump and externally clean it
- Take detailed photos of assembly orientation to prevent errors during reassembly and avoid injury from pressurized components
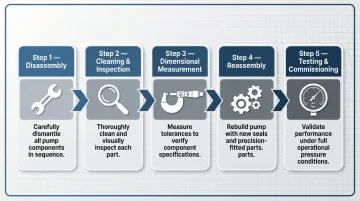
How to Rebuild a Piston Pump Efficiently: Step-by-Step
Step 1: Disassembly
Work systematically from the outside in:
- Remove end caps, control valves, and port blocks
- Access internal rotating group components (cylinder block, pistons, valve plate, swash plate)
- Mark or tag each part's orientation and position as it is removed
- Photograph complex subassemblies before separation so you can reassemble in the correct order
Step 2: Cleaning and Initial Inspection
- Clean all metal components with appropriate solvent and lint-free cloths
- Never use compressed air directly on precision surfaces—particles can embed in sealing faces
- Perform a visual inspection for obvious damage:
- Cracks in the housing
- Scoring on the cylinder bore
- Pitting on valve plate sealing faces
- Damaged bearing races
- Flag parts that require measurement before deciding on replacement
Step 3: Dimensional Measurement and Component Assessment
Measure all critical wear surfaces using a micrometer and dial indicator:
- Piston diameter and cylinder bore diameter (check for ovality)
- Valve plate surface flatness
- Swash plate surface condition
Compare readings against manufacturer tolerance tables from the service manual. For example, the Kawasaki K3VL manual specifies a standard piston-to-bore clearance of 0.019 - 0.039 mm, with a replacement limit of 0.040 - 0.067 mm.
Pass/fail decision rule: Reuse parts within tolerance only if no surface defects are present. Parts outside tolerance or showing scoring, pitting, or cracking must be replaced—never make exceptions to this rule.
Step 4: Reassembly with Correct Specifications
With replacement parts confirmed, reassembly can begin:
- Install all new seals, O-rings, and piston packing from the rebuild kit
- Lightly lubricate seals with clean hydraulic fluid during installation
- Ensure shaft seals are seated squarely to avoid leakage paths
- Reassemble the rotating group carefully
- Torque all fasteners to manufacturer's specified values using a calibrated torque wrench
Incorrect torque — in either direction — causes micro-movement between mating surfaces under pressure cycling, wearing out new seals prematurely.
Step 5: Testing and Commissioning
- Pre-fill the pump case with clean hydraulic fluid before startup to prevent dry-start bearing damage
- Install the pump and initially run at no-load condition to check for leaks and abnormal noise
- Apply full system pressure only after no-load verification
- Verify output pressure and flow against the pump's rated specifications
- Document test results as the baseline for future maintenance tracking — this record also supports any warranty claims on the rebuild
Key Parameters That Affect Rebuild Quality
Even with correct parts and tools, rebuild outcomes depend on controlling several technical variables—missing any one of these commonly results in premature failure.
Component Clearances and Dimensional Tolerances
Piston-to-bore clearance and valve plate flatness directly determine internal volumetric efficiency. Precision-lapped axial piston pump surfaces operate on clearances as tight as 0.5–5 µm — any microscopic debris introduced during rebuild acts directly against these tolerances.
Even minor deviations beyond manufacturer limits cause excessive internal leakage and reduced output pressure. The Parker C081 service manual specifies piston diameter at 21.485–21.5 mm and bore diameter at 21.5–21.535 mm — clearance margins of just fractions of a millimeter.
Contamination Control During Assembly
Particles introduced during rebuild — even microscopic debris from tools, rags, or the workspace — act as abrasives against precision-lapped surfaces. Between 70% and 90% of all hydraulic system failures are directly caused by fluid contamination.
A single rebuild performed on a contaminated bench can waste all the money and time spent on parts and labor, causing accelerated wear from the first hours of operation.
Torque Accuracy on Assembly Fasteners
Critical bolts on the valve plate, end cap, and control valve body must be tightened to exact specifications. Under-torquing creates leak paths; over-torquing distorts precision bores and sealing faces.
Improper torque produces uneven clamping loads, which cause micro-movement between mating surfaces under pressure cycling — accelerating seal wear and loosening fasteners over time.
Hydraulic Fluid Quality and Cleanliness at Startup
The fluid used to pre-fill the pump case and flush the system post-rebuild must meet the pump's viscosity specification and cleanliness rating. Dirty startup fluid bypasses all the precision work done during rebuild.
Two specs that directly determine whether the rebuild survives its first hours of operation:
- Cleanliness: ISO 4406 level 18/16/13 is the accepted standard for axial piston pumps — anything dirtier allows particles larger than the fluid film to destroy lapped surfaces
- Viscosity: Operating outside OEM viscosity limits (for example, exceeding 1000 cSt during cold starts) breaks down the elastohydrodynamic film (the lubricating layer that prevents metal-to-metal contact), leading to rapid wear
Common Mistakes When Rebuilding a Piston Pump
- Skipping dimensional measurements: Components that look serviceable can still fall outside tolerance. This is the single most common reason rebuilt pumps fail early — always measure, don't assume.
- Contaminating the work environment: Shop rags, compressed air, and non-hydraulic solvents introduce particles that act as embedded abrasives, causing damage within the first hours of operation.
- Reusing old seals, O-rings, or piston packing: Seal components are cheap relative to labor. Always replace the full set using a model-specific rebuild kit, regardless of how they look.
- Skipping the pre-fill and no-load break-in procedure: Bringing a freshly rebuilt pump straight to full pressure causes dry-start bearing damage. It can destroy the rebuild within minutes.
When to Rebuild vs. Replace vs. Use a Professional Exchange Service
Rebuilding in-house makes the most economic sense when:
- The pump housing is structurally sound
- Wear is confined to internal rotating group components
- The pump model is discontinued or a direct replacement is unavailable
- A skilled technician with proper measuring tools is on hand
Outright replacement is the better option when:
- The housing is cracked or the shaft is bent
- Failure was catastrophic (seized piston, shattered cylinder block)
- The total cost of rebuild labor and parts approaches the price of a new unit
When equipment downtime is the critical constraint (peak season for agricultural or construction operations, for example), a professional exchange program is the most efficient solution. In-house or authorized rebuilds cost 50% to 70% less than purchasing new units, but exchange programs eliminate the labor burden entirely.
Hydrostatic Transmission Service's Short-Time Exchange program provides quality-tested, rebuilt-to-manufacturer-spec units with a 1-year warranty, allowing immediate swap-in while minimizing hours of lost productivity. One offshore oil company faced an 18-week lead time for a new tandem pump but secured a direct equivalent exchange unit dispatched within 24 hours.
The right choice depends on your available technical skill, the cost gap between rebuilding and replacing, acceptable downtime, and parts availability. Most rebuild decisions go wrong when operators underestimate the precision required for a quality in-house repair.
Frequently Asked Questions
What is the lifespan of a piston pump?
In clean, stationary industrial applications, axial piston pumps can last 20,000 to 40,000 hours. Service life varies with application intensity, fluid cleanliness, and maintenance frequency. A quality rebuild can restore the pump to near-original performance.
What are common piston pump problems?
The most frequent issues include pressure or flow loss (worn pistons or valve plate), external leakage (failed shaft seals or O-rings), abnormal noise or vibration (bearing failure or cavitation), and overheating (internal inefficiency from worn components). Contamination accounts for 70-90% of hydraulic failures, making fluid cleanliness the primary factor in pump longevity.
Is it worth rebuilding a piston pump?
Rebuilding is typically cost-effective when the pump housing is intact and wear is limited to internal components—rebuild cost is usually 50-70% less than replacement. Quality of execution matters greatly, though: a poorly done rebuild can cost more in repeat failures than buying new, making proper measurement, cleanliness, and torque control essential.
What tools do you need to rebuild a piston pump?
Essential tools include a calibrated torque wrench, outside micrometer and dial indicator for tolerance measurements, bearing puller and press, snap ring pliers, clean work surface, and a hydraulic test setup for post-rebuild pressure verification. ISO 6789:2017 compliant torque wrench calibration is mandatory for precision hydraulic assembly.
How long does a piston pump rebuild typically take?
Most full rebuilds take 4–8 hours depending on pump size and complexity. Factor in additional time if replacement parts aren't sourced in advance, plus the post-rebuild pressure test and commissioning procedure.
What is the difference between a piston pump repair and a rebuild?
A repair targets a specific, isolated fault (e.g., replacing a leaking shaft seal or a damaged control valve) while a rebuild involves complete disassembly, inspection of all components against manufacturer tolerances, and replacement of all wear parts. A rebuild restores near-new performance while a repair addresses the immediate symptom.