Introduction
When a Rexroth hydraulic pump fails mid-operation, everything downstream stops. These pumps—covering axial piston (A10V, A4V, A7V, A11V), gear (AZPF, G2, G3), and vane (PV7, PVV) series—power industrial machinery, construction equipment, and agricultural systems that can't afford unplanned downtime. Proper repair procedures are what keep them running.
Skipping proper repair procedures sets off a predictable chain of damage. Common consequences include:
- Accelerated wear on precision surfaces from contaminated fluid
- Fluid loss and contamination ingress from neglected seal inspections
- Premature bearing failure from incorrect reassembly torque
- Sudden pressure loss creating safety hazards on the job site
This guide covers the complete repair process—diagnostics, disassembly, component inspection, and reassembly—so each step is done right the first time.
Key Takeaways
- Rexroth pumps require model-specific repair procedures—always verify your exact model from the nameplate before starting work
- Contaminated fluid, worn seals, cavitation, and skipped inspections cause most failures
- Safe repair requires depressurizing the system, draining fluid, and following OEM torque specs during reassembly
- For severe internal damage, a professional rebuild or exchange program typically saves time and money compared to field repair
Understanding Rexroth Hydraulic Pump Types and Key Components
Rexroth manufactures three distinct pump families, each engineered for specific pressure ranges and circuit configurations. Repair procedures vary significantly across these types, so accurate identification comes first.
Primary Pump Families and Applications
Axial Piston Pumps (A10V, A4V, A7V, A11V series) handle the heaviest work — pressures from 280 to 450 bar in excavators, injection molding machines, and heavy-duty presses. Variable displacement makes them the go-to for load-sensing systems where flow demand shifts constantly.
Gear Pumps (AZPF, G2, G3 series) stay in lower-pressure territory: pilot systems, lubrication circuits, and charge pump functions. They're simpler than axial piston units but need different seal materials and tighter clearance specs than most technicians expect.
Vane Pumps (PV7, PVV series) earn their place in machine tool hydraulics and plastic processing equipment. The tradeoff for quiet, pulsation-free flow is more sensitivity to fluid cleanliness than gear pumps.
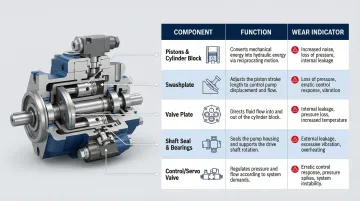
Key Internal Components of Axial Piston Pumps
Understanding the rotating assembly is essential for effective repair:
| Component | Function | Wear Indicator |
|---|---|---|
| Pistons & Cylinder Block | Nine or more pistons stroke within precision-bored cylinders to create pumping action | Reduced volumetric efficiency; elevated case drain flow |
| Swashplate | Angled plate converts rotation into piston stroke; angle sets displacement | Worn face surface; loss of displacement control |
| Valve Plate | Stationary plate with kidney-shaped ports directing flow in and out of cylinder bores | Scoring or pitting; internal leakage; pressure loss |
| Shaft Seal & Bearings | Seal prevents external leakage; bearings handle radial and axial loads | Shaft seal leak often signals bearing wear causing shaft deflection |
| Control/Servo Valve | Servo pistons and control valves adjust swashplate angle on variable displacement units | Erratic displacement; sensitive to any fluid contamination |
Reading the Rexroth Nameplate
The nameplate contains essential data for sourcing parts and repair manuals. Key fields include:
- Manufacturer and manufacturing date (FD)
- Direction of rotation (viewed from drive shaft end)
- Rated rotational speed
- Displacement size (cc/rev)
- Serial number (SN) and material number (MNR)
- Type code (defines exact configuration)
Document this information before disassembly. The type code alone can contain 20+ characters specifying control type, port configuration, seal material, and special features—all critical for ordering correct seal kits and replacement parts.
Common Rexroth Hydraulic Pump Problems and Warning Signs
Most Rexroth pump failures announce themselves through measurable symptoms days or weeks before catastrophic failure. Recognizing these warning signs enables proactive intervention.
Low Pressure or Insufficient Flow Output
Worn pistons, scored cylinder blocks, or excessive internal leakage cause volumetric efficiency loss: the pump recirculates fluid internally rather than delivering it to the system. A healthy axial piston pump maintains 95%+ volumetric efficiency. When efficiency drops below 90%, internal wear has progressed significantly.
What to measure: Compare actual flow output at rated pressure against catalog specifications. A 10–15% flow loss indicates wear requiring attention; 20%+ loss demands immediate repair or replacement.
Abnormal Noise
Cavitation noise presents as crackling or popping sounds, similar to gravel in a blender. Rexroth specifies a minimum absolute inlet pressure of 0.8 bar to prevent cavitation damage. Inadequate suction pressure or clogged inlet filters starve the pump, causing vapor bubbles that implode violently against internal surfaces, eroding metal within hours.
Bearing failure noise sounds different: a grinding or squealing that worsens as RPM climbs. This indicates bearing race damage or insufficient lubrication, often caused by contaminated case drain flow.
These two failure modes require opposite responses. Cavitation points to an inlet system problem you can correct while running diagnostics; bearing noise means shut down immediately to prevent catastrophic shaft failure.
Overheating
Elevated fluid temperature accelerates seal degradation and increases internal leakage: higher temperatures thin the fluid, which increases leakage, which raises temperatures further. Standard NBR seals degrade rapidly above 85°C, while FKM seals handle up to 110°C. Rexroth notes that bearing areas run approximately 5°C hotter than measured case drain temperature.
Common causes:
- Incorrect fluid viscosity (too thick = excessive friction)
- Clogged return filters (restricted flow = heat buildup)
- Insufficient case drain flow (trapped heat in pump housing)
Monitor case drain temperature weekly under comparable load conditions. A gradual upward trend over months signals developing problems.
External Leaks and Shaft Seal Failure
A leaking shaft seal rarely fails in isolation: it's usually a symptom of bearing wear or misaligned couplings creating side-loading. Ignoring the leak leads to fluid loss and contamination ingress, accelerating internal damage as debris enters the system.
Always replace the seal and investigate the root cause:
- Check coupling alignment
- Inspect bearings for rough rotation
- Verify radial shaft loads remain within specifications
Erratic Operation or Control Failure
Variable displacement pumps that don't respond correctly to displacement commands typically suffer from contaminated control valves or sticking servo pistons. Rexroth mandates ISO 4406 cleanliness class 20/18/15 for standard operation, tightening to 19/17/14 for high-temperature applications.
Control valve clearances measure in microns. At that scale, particles you can't see are large enough to jam these components. If displacement response feels sluggish or inconsistent, pull a fluid sample for particle count analysis before disassembling the control circuit.
Step-by-Step Rexroth Hydraulic Pump Repair Process
Safety and Preparation
Mandatory pre-disassembly steps:
- Shut down and lock out/tag out the machine per OSHA standards
- Fully depressurize the hydraulic system—verify zero pressure at multiple test ports
- Allow the pump to cool to ambient temperature (hot components cause burn injuries and thermal expansion affects measurements)
- Drain all hydraulic fluid into suitable containers for disposal or analysis
- Clean the pump exterior thoroughly to prevent contamination during disassembly
Rexroth explicitly requires that repair work be performed only by qualified personnel with mechanical, electrical, and hydraulics expertise who can read circuit diagrams and understand safety devices. Internal repairs on axial piston units should be performed by Rexroth-certified service centers.
Disassembly
General sequence for A10V/A4V axial piston pumps:
- Remove pump from system and disconnect all hydraulic lines—immediately seal all ports to prevent contamination
- Remove shaft seal and bearing retainer, documenting torque values and orientation
- Extract the rotating group (piston/cylinder block assembly) as a unit
- Remove the swashplate, noting its angle and orientation marks
- Carefully extract the valve plate—avoid scratching precision surfaces
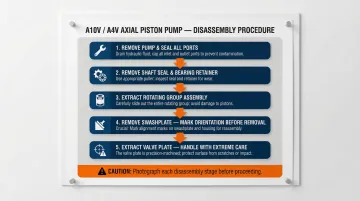
Critical: Photograph each step. Document the order and orientation of every component. Axial piston pumps contain parts that look identical but have specific orientations—installing the valve plate backwards destroys the pump on startup.
Component Inspection and Measurement
With disassembly complete, measure and inspect each component before any reassembly begins. Small tolerances matter here—a 5-micron variation in bore clearance can mean the difference between a reliable rebuild and a pump that fails within weeks.
| Component | What to Check | Action Threshold |
|---|---|---|
| Pistons & cylinder bores | Score marks, pitting, bore diameter vs. piston diameter | Replace if clearance exceeds 10–25 microns (size-dependent) |
| Swashplate face | Scratches, pitting, heat discoloration | Polish minor imperfections; replace if deeply scored |
| Bearings | Smoothness by hand, race pitting or spalling | Replace any bearing showing damage—even minor wear reduces service life |
| Seals & O-rings | Hardening, cracking, compression set | Replace all seals regardless of appearance; reusing old seals guarantees early failure |
| Control valve spool | Free movement in bore, contamination | Clean ultrasonically if sticky; replace if bore or spool is damaged |
Reassembly
Follow this sequence to avoid the most common post-repair failures:
- Use OEM seal kits — aftermarket seals often have dimensional or material variations that cause leaks; OEM kits guarantee compatibility
- Coat all internal components with clean hydraulic fluid before assembly — pistons, bores, swashplate faces, and bearings all need lubrication to survive the first startup
- Torque to spec with a calibrated wrench — follow Rexroth's specified tightening sequence; incorrect torque (either direction) is a leading cause of post-repair failure
- Verify orientation before closing — cross-check valve plate and swashplate position against your disassembly photos; incorrect orientation causes immediate catastrophic failure
Post-Repair Commissioning and Testing
Startup procedure after repair:
- Fill and air-bleed the pump housing before starting—trapped air causes cavitation damage
- Run initially at low speed and zero load for 5-10 minutes, checking for leaks and abnormal noise
- Gradually increase pressure while monitoring output flow and temperature—don't jump to full pressure immediately
- Perform functional testing to verify the pump meets expected performance benchmarks from catalog data
Rexroth recommends a flushing cycle after repair to remove contaminants introduced during the process. Flush the system with the pump excluded from the circuit, then connect the pump once fluid cleanliness meets specifications.
Rexroth Hydraulic Pump Maintenance Schedule
Maintenance intervals depend heavily on operating conditions. High-load, continuous-operation environments demand more frequent checks than light or intermittent use. The following schedule provides baseline intervals—adjust based on your specific application severity.
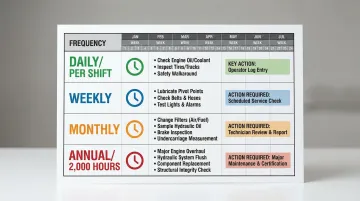
Maintenance Frequency Table
| Frequency | Inspection Tasks | Action Required |
|---|---|---|
| Daily / Per Shift | External leaks, abnormal noise, fluid level, operating temperature | Visual inspection for wet spots; listen for cavitation or grinding; check reservoir level; verify temperature within normal range |
| Weekly | Suction filter condition, case drain flow volume | Inspect filter for clogging or damage; measure case drain flow—increasing flow indicates internal wear |
| Monthly | Fixing element torque, line connections, fluid cleanliness | Re-torque mounting bolts when system is off and depressurized; check hose connections for seepage; sample fluid for ISO 4406 analysis |
| Annual / 2,000 Hours | Complete fluid change or lab analysis, shaft seal inspection, performance benchmarking | Replace fluid or conduct lab analysis for viscosity, aging, and contamination; inspect seal for leakage; test output flow and pressure against baseline |
Documenting Inspection Results
Trending data enables early detection of wear before failure occurs. Track these parameters over time:
- Case drain flow rate (gradually increasing flow signals internal wear)
- Operating temperature under comparable load (rising temps indicate efficiency loss)
- Output flow at rated pressure (declining flow shows volumetric efficiency degradation)
A maintenance log that tracks gradual changes gives you enough lead time to schedule repairs during planned downtime.
Hydraulic Fluid Quality: The Single Most Impactful Variable
Rexroth requires ISO 4406 cleanliness class 20/18/15 for standard operation, with stricter 19/17/14 for high-temperature applications. Meeting this standard is required for warranty coverage and achieving rated service life.
Viscosity grade: ISO VG 46 is common for industrial applications. The fluid should maintain operating viscosity between 16-36 mm²/s in your actual operating temperature range. For VG 46 fluid, this corresponds to approximately 5-85°C.
Filtration requirements: Rexroth recommends filter materials rated for the target cleanliness level—typically 10-micron filters for standard piston pumps, with 6-micron filters for systems containing proportional valves. Filter selection should be based on your specific ISO 4406 target, not a generic micron rule.
Fluid change intervals: Replace fluid after the first 100 operating hours for new or rebuilt units to flush initial wear debris. After that initial flush, conduct fluid analysis yearly or every 2,000 hours to determine if replacement is necessary.
When to Repair In-House vs. When to Use a Professional Rebuild Service
Suitable In-House Repairs
Minor repairs are appropriate for maintenance teams with proper training and tooling:
- Seal replacements (shaft seal, housing O-rings)
- Control valve cleaning and inspection
- Filter changes and fluid sampling
- External component swaps (pressure compensator, load-sense valve)
These tasks require basic hydraulic knowledge, standard hand tools, and OEM seal kits—but don't involve precision machining or tolerance verification.
When Professional Rebuild Is Required
Internal damage involving scored cylinder blocks, worn pistons beyond tolerance, or damaged swashplates demands specialized equipment:
- Precision measurement tools (bore gauges, micrometers calibrated to 0.001mm)
- Lapping equipment for swashplate and valve plate resurfacing
- Test stands for pressure and flow verification
- OEM-grade parts with certified dimensional tolerances
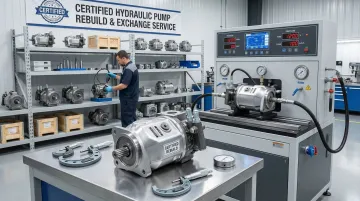
Attempting these repairs without the right resources creates serious downtime risk. Sourcing parts, waiting on disassembly inspection results, and completing functional testing can consume weeks. A professional exchange program sidesteps that entirely—a pre-tested unit ships immediately while your core is evaluated.
Hydrostatic Transmission Service offers a Short-Time Exchange Program backed by a 1-year warranty. Each unit is rebuilt and tested to manufacturer specifications using Statistical Process Control, comparing quality data directly against OEM standards. For facilities running tight production schedules, this cuts weeks of downtime to days.
Practical Decision Framework
Choose professional rebuild or exchange if:
- The pump makes metal-on-metal grinding noise
- Flow output has dropped 20-30% below rated capacity
- Internal inspection reveals visible scoring on cylinder block or pistons
- Swashplate shows deep pitting or heat damage
In-house repair is appropriate if:
- The issue is limited to external seals or O-rings
- Contamination caused control valve sticking (cleanable)
- External leaks from port connections or case drain fittings
- Filter changes or fluid replacement
Conclusion
Rexroth hydraulic pumps are precision components that reward structured maintenance. Identifying warning signs early—cavitation noise, rising case drain flow, elevated temperatures—enables proactive intervention before minor wear becomes catastrophic failure.
Consistent repair practices make the difference between a pump that lasts and one that fails prematurely. Three habits protect both the pump and the broader hydraulic system:
- Document every repair step and follow torque specifications without shortcuts
- Maintain fluid cleanliness to ISO 4406 standards throughout service intervals
- Track case drain flow and temperature trends between maintenance windows
When in-house repair reaches its limits—internal scoring, worn rotating groups, or damaged control assemblies—Hydrostatic Transmission Service offers rebuild and exchange programs backed by a 1-year warranty and over 100 years of combined technician experience. Units are tested to manufacturer specifications before return, so your equipment is back in service at full performance—not just patched.
Frequently Asked Questions
What are common piston pump problems?
The most frequent failure modes are:
- Low pressure or flow from worn pistons, cylinder block, or valve plate
- Cavitation damage from suction pressure below 0.8 bar absolute
- Overheating from contaminated fluid or incorrect viscosity
- Shaft seal leaks indicating bearing wear or misalignment
- Control valve sticking from fluid exceeding ISO 4406 cleanliness limits
What is the lifespan of a piston pump?
With clean fluid meeting ISO 4406 standards and consistent maintenance, Rexroth axial piston pumps can reliably reach many thousands of operating hours. Service life depends on fluid cleanliness, operating pressure, duty cycle severity, and maintenance intervals. Rexroth does not publish universal hour ratings — lifespan is application-specific.
What are four things that require testing in a hydraulic system?
Essential hydraulic system tests include system pressure verification at both rated operating pressure and relief valve settings, flow output measurement to calculate pump volumetric efficiency, hydraulic fluid temperature and cleanliness level analysis per ISO 4406 standards, and case drain leakage flow rate measurement as an indicator of internal wear progression.
What does A and B mean on a hydraulic pump?
A and B designate the two main working ports. In open circuit configurations, A is the pressure/outlet port and B is the return/inlet port. In closed circuit pumps, both ports alternate between high and low pressure depending on the direction of operation.
What are the parts of the axial piston pump?
Primary components include the drive shaft, cylinder block, pistons with slipper pads, swashplate (or bent axis), valve plate with kidney-shaped porting, shaft seal, radial and thrust bearings, and the control assembly — which adjusts displacement via a servo piston, pressure compensator, or load-sense valve.
What is the difference between load sense and pressure compensated?
A pressure-compensated pump limits displacement when system pressure hits a set maximum, regardless of actual load. A load-sense pump maintains a fixed pressure differential (typically 15-25 bar) above actual load pressure, delivering only the flow the system needs — making it more energy-efficient in variable-load applications.