Introduction
When a John Deere hydraulic pump fails, everything stops — the three-point hitch, remote cylinders, loader functions. Your tractor becomes an expensive obstacle in the field. Over 75% of hydraulic system failures are caused by contamination, making cleanliness the single most critical factor in both pump failure and rebuild success.
Rebuilding a John Deere hydraulic pump is within reach for a skilled DIYer, but outcomes depend heavily on pump type, component condition, and how strictly you follow cleanliness standards. Legacy models like the 3010, 3020, and 4020 use closed-center radial piston pumps that require a different approach than the gear pumps found on later tractors.
This guide covers the complete process — from diagnosis to pressure testing — so you can decide whether a DIY rebuild fits your situation or if professional service is the smarter call.
Key Takeaways
- Rebuilding involves diagnosis, disassembly, thorough cleaning, seal replacement, reassembly to torque spec, and pressure testing
- You'll need a model-specific seal kit, torque wrench, snap ring pliers, micrometer, and a spotless workspace
- Contamination causes 75%+ of pump failures—cleanliness is non-negotiable throughout the rebuild
- New seals won't salvage worn pistons, valve plates, or barrels that measure outside manufacturer spec
- Heavily scored housings or internal parts call for a professional rebuild or exchange unit—not a DIY seal swap
Tools and Parts You'll Need Before Starting
Gather everything before disassembly. Stopping mid-rebuild to source a missing part extends downtime and opens the pump to contamination.
Tools and Equipment Required
Essential hand tools:
- Torque wrench (calibrated, capable of 20-100 ft-lbs range)
- Snap ring pliers (internal and external)
- Seal pick tools and seal drivers
- Rubber mallet
- Micrometer or dial gauge (0.001-inch precision minimum)
- Parts cleaning basin or solvent tank
- Lint-free rags only (shop towels leave fibers that contaminate seals)
- Clean containers for hydraulic fluid drainage
- Compressed air source
Parts and Rebuild Materials
You'll need a model-specific seal/rebuild kit. Confirm the part number against your exact pump model, because radial piston pumps on 3010, 3020, and 4020 tractors require different kits than gear pumps on later models.
OEM John Deere seal kits:
- RE29107: Full overhaul kit for 40 cm³ and 50 cm³ pumps (3020, 4020, 4050, 4440)
- RE29103: Standard seal kit for 3010, 3020, 4020 models
- R39810: Seal drain update kit (mandatory for updated pumps on non-updated 3010/4010 tractors)
Avoid cheap generic kits. Low-quality seals are a leading cause of premature pump failure, particularly when the seal compound is incompatible with your hydraulic fluid. Mineral oil, synthetic, and biodegradable fluids each require a different seal material, so confirm compatibility before ordering.
How to Rebuild a John Deere Hydraulic Pump: Step-by-Step
Step 1: Test and Diagnose the Pump Before Removal
Perform a pressure test at the priority valve (not the remote) to get an accurate baseline reading. Look up the manufacturer's specified pressure for your model—for example, the John Deere 4020 should maintain 2250 psi standby pressure. A reading significantly below spec indicates pump wear or internal bypass.
Document these failure symptoms before disassembly:
- Slow hydraulic response
- Whining or cavitation noise
- External leaks around seals
- Inability to hold pressure under load
Without a baseline pressure test, you won't know if your rebuild actually improved performance or if the problem lies elsewhere in the system.
Step 2: Remove and Externally Clean the Pump
Relieve system pressure before disconnecting hydraulic lines. Label and cap all ports immediately to prevent contamination. Remove the pump from the tractor.
Before cracking the pump open: Thoroughly degrease the exterior. Dirt on the outer casing is the most common way debris enters internal components during disassembly. Use a pressure washer or degreaser and let the pump dry completely.
Step 3: Disassemble the Pump
Work on a clean, flat surface and organize parts in sequence for reassembly reference.
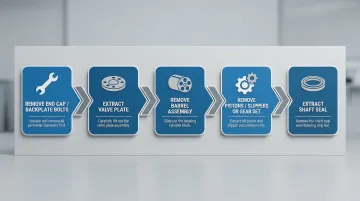
Disassembly sequence:
- Remove end cap/backplate bolts
- Extract valve plate
- Remove barrel assembly
- Remove pistons/slippers (piston pumps) or gear set (gear pumps)
- Extract shaft seal
Watch for evidence of prior work: Check for spacer shims or signs the pump was previously rebuilt. Prior amateur repairs—damaged washers, improperly installed shims—can send metal debris into the pump, causing hidden damage you'll uncover in the next step.
Step 4: Clean, Inspect, and Measure All Components
Use a solvent tank or parts washer with clean fluid. Dry all parts with lint-free cloths or compressed air—never shop rags that shed fibers. Even microscopic debris can destroy a freshly rebuilt pump.
What to inspect and measure:
| Component | What to Check | Acceptable Tolerance |
|---|---|---|
| Valve plate & barrel face | Scoring, wear grooves, surface finish | No visible scoring beyond 0.001" depth |
| Piston-to-bore clearance | Measure with micrometer | 5-40 microns (0.0002"-0.0016") |
| Pump housing | Cracks, deep scoring | No cracks; surface scoring under 0.005" |
| Piston shoe end play | Movement with dial gauge | Maximum 0.005" |
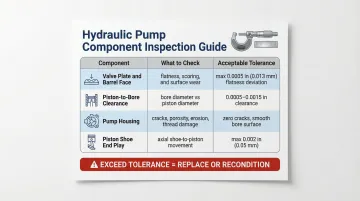
If the valve plate or barrel face shows deep scoring, or piston-to-bore clearance exceeds manufacturer spec, new seals alone will not restore full performance. These components must be replaced or professionally reconditioned.
Step 5: Replace Seals, O-Rings, and Worn Components
Replace all seals and O-rings from the rebuild kit regardless of visible condition—reusing old seals is the most common cause of repeat pump failure.
Installation specifics:
- Lightly lubricate new seals with clean hydraulic fluid before installation
- Use proper seal drivers or dowels—never metal tools that can nick seals
- Ensure quad rings and shaft seals are correctly seated and oriented
- Check seal material compatibility with your hydraulic fluid type
Seal material must match your fluid—NBR (Buna-N) works well with mineral oils and HETG biodegradable fluids, but is not recommended for PAO synthetic fluids. FKM (Viton) handles most fluids but costs more.
Step 6: Reassemble, Torque to Spec, and Pressure Test
Reassemble in reverse disassembly order. Torque all bolts to manufacturer spec—over-torquing end cap bolts is a leading cause of warping and leaks.
Typical torque specifications for John Deere radial piston pumps:
- End cap bolts: 25-30 ft-lbs (verify for your specific model)
- Valve plate bolts: 15-20 ft-lbs
- Mounting flange bolts: 40-50 ft-lbs
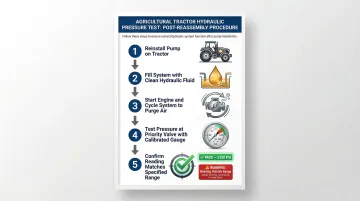
Post-reassembly pressure test:
- Reinstall the pump on the tractor
- Fill the system with clean hydraulic fluid of the correct specification
- Start the engine and cycle the system slowly to purge air
- Test pressure at the priority valve with a calibrated gauge
- Confirm the reading matches manufacturer's specified pressure range (e.g., 2250 psi for 4020)
If pressure is still low after rebuild, the cause is typically worn internal components, incorrect reassembly, or a system problem outside the pump. When a DIY rebuild doesn't resolve the issue, a professional rebuild service—like the exchange program at Hydrostatic Transmission Service—can test and remanufacture the pump to manufacturer specifications, often with a warranty.
Key Variables That Determine Rebuild Success
Two technicians can follow the same steps and get very different results. Outcomes depend on controlling these critical variables.
Fluid and System Cleanliness
Hydraulic systems have extremely tight internal tolerances—piston pumps operate with clearances of just 5-40 microns. Even fine particles act as abrasives that accelerate wear. A single contaminated component reassembled into a clean pump can trigger rapid failure.
For piston pumps, maintain an ISO 4406 cleanliness code of 18/16/13. This standard measures particle counts at three size thresholds—anything dirtier significantly shortens pump life. Water contamination is equally destructive; just 250 ppm of water can reduce bearing life by 4x.
Component Wear Tolerance and Fit
Pistons, barrel bores, and valve plates must meet manufacturer clearance specifications. If worn beyond tolerance, new seals alone will not fix internal bypass or pressure loss.
Critical measurements to record and compare against spec sheets:
- Piston-to-bore clearance (use micrometer)
- Valve plate flatness (use precision straightedge and feeler gauges)
- Barrel face surface finish
- Piston shoe end play
Rebuilding a pump with worn metal components and only new seals is one of the most common and costly DIY mistakes. If components measure beyond spec, they must be replaced or the pump requires professional reconditioning.
Seal Kit Quality and Compatibility
Seal material must match your hydraulic fluid type. An incompatible seal will swell, harden, or degrade rapidly—sometimes within hours of operation.
| Fluid Type | NBR | FKM |
|---|---|---|
| Mineral oils (Hy-Gard) | Compatible | Compatible |
| Biodegradable fluids (Bio Hy-Gard II, HETG) | Compatible | Compatible |
| Synthetic PAO fluids (HEPR) | Not recommended | Recommended |
| Polyglycol fluids (HEPG) | Limited | Limited |
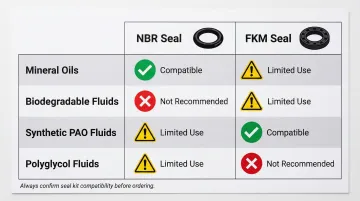
Confirm seal kit part number compatibility with your exact pump model and fluid type before ordering.
Pressure Testing and Break-In Procedure
Skipping break-in is one of the fastest ways to fail a fresh rebuild. New seals need time to seat under controlled conditions before handling full system load:
- Start under light load and run for 10-15 minutes before increasing demand
- Monitor for leaks, abnormal heat, or pressure instability throughout
- Gradually step up load rather than going directly to full operating pressure
Common Mistakes and How to Troubleshoot Post-Rebuild Issues
Even a careful rebuild can fail if a few key mistakes go unaddressed. Here are the most common ones—and how to diagnose what went wrong after the fact.
Skipping Diagnosis Before Disassembly
Opening a pump without a pressure test means you don't know your baseline. If the rebuild doesn't fix the problem, you won't know whether you've improved performance or whether the issue lies elsewhere—such as a stuck relief valve or worn cylinder seals.
Reusing Worn Internal Components
The most common post-rebuild failure is low pressure or continued internal bypass, caused by reassembling a pump with valve plates, pistons, or barrels worn beyond spec. If pressure testing still shows low output after rebuild, this is the likely cause. Components need replacement or the pump needs professional reconditioning.
Contamination During Reassembly
If the rebuilt pump runs well initially but degrades quickly (within hours to days), contamination introduced during reassembly is the likely culprit. To resolve it:
- Tear down and re-clean all components
- Reassemble in a cleaner work environment
- Flush the hydraulic system to clear any debris that entered the circuit
Pressure Still Low After Rebuild
Low pressure post-rebuild may not be the pump at all. Check these before assuming the rebuild failed:
- System relief valve setting (may be stuck or set too low)
- Stroke control adjuster screw (may need adjustment)
- Priority valve function (may be stuck or worn)
- Remote cylinder seals (internal bypass in cylinders mimics pump failure)
When to DIY vs. Use a Professional Hydraulic Pump Rebuild Service
DIY rebuilding makes sense when pump damage is limited to seal wear, the housing and internal components measure within spec, and you have mechanical experience with hydraulic systems. It saves money and can be completed with basic tools.
DIY is not the right call when:
- Valve plates or barrels are heavily scored
- Pistons are bent or worn beyond spec
- Pump housing is cracked
- You've had repeated rebuild failures
- You lack precision measuring tools
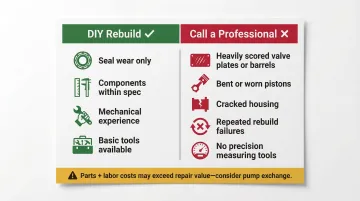
In these cases, parts and labor costs often exceed the value of the repair. Professional reconditioning or a pump exchange is the smarter financial move.
Hydrostatic Transmission Service offers professional hydraulic pump rebuilds and a Short-Time exchange program for John Deere and other major equipment brands. Units are rebuilt and tested to manufacturer specifications and carry a 1-year warranty.
Each technician is accountable for their work through a Statistical Process Control System that benchmarks quality data against manufacturer specifications — backed by over 100 years of combined industry experience.
Frequently Asked Questions
How much does it cost to repair a hydraulic pump?
DIY rebuild costs typically range from $150-$400 for a quality seal/overhaul kit, plus your labor. Professional rebuild services cost $800-$2,500 depending on pump type and severity of wear. Exchange programs offer faster turnaround and may be more cost-effective when downtime costs exceed repair savings.
How to tell if a tractor hydraulic pump is bad?
Key symptoms include low or no hydraulic pressure at the priority valve (below 2250 psi on a 4020), slow or unresponsive hydraulic functions, whining or cavitation noise during operation, and visible external leaks around shaft seals. Always pressure-test at the priority valve, not the remote, for accurate diagnosis.
What is the life expectancy of a hydraulic pump?
A well-maintained hydraulic pump can last 10,000-20,000+ operating hours. Contaminated fluid, infrequent fluid changes, and running low on fluid dramatically shorten that lifespan—maintaining an ISO 4406 cleanliness code of 18/16/13 and changing fluid per manufacturer intervals keeps pumps running longer.
What tools do I need to rebuild a John Deere hydraulic pump?
Essential tools include a calibrated torque wrench, snap ring pliers, seal picks and drivers, micrometer (0.001-inch precision), parts cleaning basin, lint-free rags, and a model-specific rebuild/seal kit. Specialty tools like dial gauges for measuring end play improve rebuild accuracy.
Can I rebuild a John Deere hydraulic pump without a rebuild kit?
Technically possible, but not recommended. Individual seals and O-rings may be purchased separately, but a rebuild kit ensures all seals are the correct material, size, and compatibility for the specific pump model and fluid type. Mismatched seals cause rapid failure and void any warranty claims.
How long does it take to rebuild a John Deere hydraulic pump?
A first-time rebuild typically takes 4-8 hours including cleaning and inspection time. Budget a full day for your first rebuild—rushing the cleaning and inspection steps is the most common cause of a failed rebuild.