Introduction
Hydraulic motors convert hydraulic pressure into rotational force, driving everything from excavator slew rings to agricultural harvester conveyor systems. When internal wear, contamination, or operating stress accumulates, performance drops—and a full rebuild becomes the fastest path back to factory specifications.
Approximately 80% of mechanical wear in hydraulic systems stems from particle contamination, with particles as small as 3–5 microns bridging critical clearances and causing abrasive scraping. Cavitation damage, seal failure, and overheating compound the problem. The end result: a motor that can't deliver rated torque, leaks oil, or runs dangerously hot under load.
This guide covers how to recognize when a rebuild is needed, the step-by-step process to do it right, the mistakes that cause callbacks, and when replacement makes more sense than repair.
Key Takeaways
- A full rebuild covers disassembly, component inspection, seal replacement, reassembly to torque specs, and a validated test run
- Most failures trace back to internal scoring, cavitation damage, seal failure, fluid contamination, or overheating
- Replace all seals and O-rings during any rebuild—never reuse them
- If rebuild cost reaches 50% or more of a new motor's price, replacement typically wins on cost
- In critical downtime situations, a professional exchange program is faster than a field rebuild
What Is a Hydraulic Motor and When Does It Need a Full Rebuild?
A hydraulic motor converts hydraulic fluid pressure and flow into mechanical torque and rotation. It's the workhorse behind industrial and mobile equipment: excavators, combines, conveyors, winches, and more.
Unlike a hydraulic cylinder that produces linear motion, a motor produces continuous rotary motion—making it ideal for driving wheels, augers, fans, and rotating machinery.
Repair vs. Rebuild: Understanding the Difference
A repair addresses an isolated issue. A rebuild involves full disassembly, inspection, replacement of all worn components, and reassembly to OEM specifications. It's warranted when performance has degraded beyond what a single fix can restore.
Common repair scenarios include:
- Replacing a leaking shaft seal
- Swapping out a single worn bearing
- Tightening or resealing a loose fitting
A rebuild becomes necessary when multiple internal components are worn or when a repair fails to restore performance.
Rebuilding is typically more cost-effective than replacement for motors with localized internal wear, provided core structural components (cylinder block, housing, drive shaft) remain within manufacturer tolerances. When these core parts are damaged beyond spec, replacement becomes the smarter choice.
Signs Your Hydraulic Motor Needs a Rebuild
Rebuild decisions come down to two things: what you're hearing and feeling from the motor, and what a physical inspection reveals. Catching these signs early keeps minor wear from turning into full component failure.
The four most common indicators are:
Loss of Torque or Output Speed
The motor struggles to reach rated speed under load or delivers noticeably less torque than expected. This points to worn pistons, scored cylinder block bores, or valve plate wear — any of which opens internal clearances and lets pressurized fluid bypass the pistons instead of driving them.
External or Internal Leaks
Visible oil around shaft seals or case drain flow well above baseline are both red flags. A Parker F12-250 motor, for example, has a normal drain flow of 2.4 l/min — once flow exceeds 6.1 l/min, internal damage is confirmed and a rebuild is required. The usual culprits are degraded shaft seals, worn O-rings, or loose end cap fasteners.
Unusual Noise (Grinding, Knocking, or Whining)
New sounds — especially under load — signal internal distress. Grinding typically means bearing wear or contaminated fluid scoring surfaces. Knocking or whining often points to cavitation: restricted inlet flow creates fluid voids that implode under pressure, pitting the valve plate and pistons and breaking away surface material with each cycle.
Overheating
Running above 82°C (180°F) — or above 93.3°C (200°F) for motors rated to that threshold — indicates a problem. Excessive internal leakage forces fluid to recirculate, generating heat. Degraded viscosity or contamination compounds the friction. Left unchecked, the heat accelerates seal breakdown and turns a manageable repair into a complete failure.
How to Rebuild a Hydraulic Motor: Step-by-Step Process
A clean workspace, the right tools, and the manufacturer's service manual are the baseline requirements for a successful rebuild. Skip any of these and post-rebuild failure becomes likely, not just possible.
Step 1: Preparation — Safety, Tools, and Workspace
Safety first:
- Relieve all system pressure before disconnecting the motor
- Apply lockout/tagout procedures to isolate energy sources
- Drain the motor case completely before disassembly
Essential tools:
- Torque wrench
- Snap ring pliers
- Seal driver set
- Micrometer or dial bore gauge
- Feeler gauges
- Cleaning solvent
- Lint-free rags
- Parts tray for organized component staging
Workspace requirements:
- Work on a clean, debris-free surface — contamination introduced during reassembly is a leading cause of premature failure
- Keep the manufacturer's service manual open throughout for torque specs and clearance tolerances
Step 2: Disassembly and Documentation
Before removing any components:
- Photograph all port connections, orientation markings, and visible wear patterns
- Mark mating faces with a paint pen to ensure correct reassembly alignment
Remove components in the sequence specified by the service manual:
- End cap
- Valve plate (port plate)
- Cylinder block
- Piston assembly
- Drive shaft
Place components in the order they were removed. Note any discoloration (heat marks), metallic debris in the case drain fluid, or obvious scoring—these observations will guide the inspection step.
Step 3: Inspect and Measure Wear Components
Valve plate (port plate): Inspect for scoring, erosion, or flatness deviation. Any visible scoring, heavy scratches, or erosion typically requires valve plate replacement. Use a straightedge and feeler gauge to check flatness—deviations beyond manufacturer spec (often 0.001–0.002 inches) mandate replacement.
Pistons and cylinder block: Check using a micrometer and dial bore gauge. Look for:
- Scoring or discoloration
- Out-of-round bores
- Clearance beyond manufacturer's wear limit
- Cavitation pitting on the cylinder block face (appears as small craters or surface erosion)
Bearings and drive shaft:
- Inspect bearings for roughness, pitting, or cage damage
- Check the drive shaft for keyway damage, seal journal wear, and straightness
- Replace any shaft with scoring in the seal area — a scored journal will not hold a seal under pressure
Step 4: Clean All Components and Source Replacement Parts
Cleaning protocol:
- Clean all metal components with appropriate hydraulic solvent
- Use lint-free rags and compressed air to dry completely
- Never use shop rags that may leave fiber contamination
Parts replacement:
- Replace all seals, O-rings, and backup rings regardless of apparent condition
- Order a rebuild kit that includes all sealing elements for the specific motor model
- Order replacement parts (pistons, valve plate, bearings) based on inspection findings
- Ensure parts match OEM specifications for the motor model and serial number
Reusing seals is worth calling out specifically: even seals that look intact have taken a compression set and will leak once back under pressure. Always replace them, without exception.
Step 5: Reassembly to Manufacturer Specifications
Lubrication: Lubricate all internal components with clean hydraulic fluid of the correct viscosity before assembly. Install new shaft seals with a seal driver—never use a screwdriver or improvised tool that can deform the seal.
Assembly sequence:
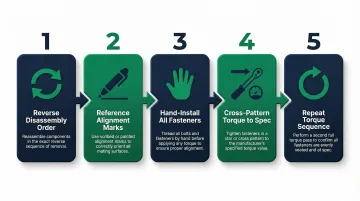
- Reassemble components in reverse of the disassembly sequence
- Reference the paint marks made earlier for correct orientation
- Install all fasteners by hand first
- Torque to spec in a cross-pattern using manufacturer's torque values
- Repeat the torquing sequence a second time to compensate for gasket compression set
Before closing the end cap, verify the valve plate is correctly oriented for port alignment. This is the single most common reassembly error — and it causes immediate failure on startup.
Step 6: Testing and Validation
Pre-fill: Pre-fill the motor case with clean hydraulic fluid matching system viscosity before reconnecting to the circuit. Running a rebuilt motor dry will damage bearings and seals.
Initial startup:
- Reconnect to the system and run initially at low pressure (approximately 25–30% of rated pressure) for several minutes
- Listen for abnormal noise
- Check for leaks at all connections
- Monitor case drain flow
Full-load testing:
- Gradually bring the motor to rated operating pressure and load
- Verify output speed and torque match expected performance
- Monitor temperature during the first operating cycle
- Watch for recurrence of pre-rebuild symptoms over 24–48 hours
Rebuild vs. Replace: How to Decide
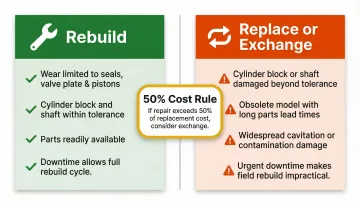
Three factors drive this decision: the extent of internal damage, motor age and parts availability, and cost. As a general rule, if rebuild cost (labor + parts) exceeds 50% of the price of a new or exchange motor, replacement warrants serious consideration.
Rebuild When:
- Wear is limited to seals, valve plate, and pistons with no structural damage
- The cylinder block and shaft are within manufacturer tolerances
- The motor model is still supported with readily available parts
- Downtime allows for a thorough rebuild and test cycle
When none of those conditions apply, replacement or exchange is the smarter call.
Replace or Exchange When:
- The cylinder block, housing, or shaft is damaged beyond tolerance
- The motor is an obsolete model with long parts lead times
- Internal cavitation or contamination damage is widespread
- Urgent downtime pressures make a multi-day field rebuild impractical
For replacement cases, an exchange program is often the fastest path back to operation. Hydrostatic Transmission Service's Short-Time Exchange Program ships a tested, warranted rebuilt unit while your core is being evaluated — cutting downtime significantly compared to a field rebuild. For context, remanufactured motors from major suppliers typically deliver up to 35% cost savings versus new units and carry the same 18- to 24-month warranties.
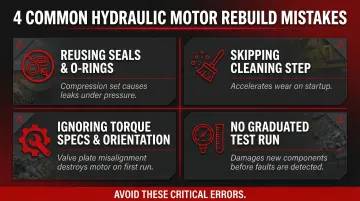
Common Mistakes to Avoid When Rebuilding a Hydraulic Motor
These four mistakes account for the majority of hydraulic motor failures after a rebuild. Avoiding them is straightforward — it mostly comes down to patience and following the manual.
Reusing Seals and O-Rings
Even seals that appear intact will have taken a compression set and will leak under pressure. Always replace every sealing element with a full rebuild kit matched to the motor model — there's no acceptable shortcut here.
Skipping or Rushing the Cleaning Step
Contaminants left on components cause accelerated wear the moment the motor starts up. Proper cleaning requires:
- Removing all metal particles, old fluid, and solvent residue from every component
- Allowing parts to fully dry before assembly
- Avoiding cloth or paper towels — lint introduced into a hydraulic system will cause damage
Ignoring Torque Specifications and Assembly Orientation
Under-torqued fasteners lead to leaks; over-torqued fasteners distort housings. An incorrectly oriented valve plate will destroy the motor on first run. Always reference the manufacturer's service manual — never rely on feel or prior experience with a different model.
Returning to Service Without a Graduated Test Run
Bringing a rebuilt motor straight to full load before validating performance at reduced pressure risks damaging new components before problems can be caught. The protocol is simple:
- Start at low pressure and minimal load
- Monitor for leaks, unusual noise, and temperature
- Increase load gradually only after stable operation is confirmed
Frequently Asked Questions
Can you rebuild hydraulic motors?
Yes, most hydraulic motors can be rebuilt through disassembly, inspection, component replacement, and reassembly to OEM specs. Whether DIY or professional rebuilding is appropriate depends on the technician's experience and the extent of internal damage.
How much does it cost to rebuild a hydraulic motor?
Parts kits alone range from $200 to $2,000+ depending on motor size and type, with labor adding several hundred to several thousand dollars. If total rebuild cost approaches the price of an exchange unit, replacement often delivers better long-term value.
How to tell if a hydraulic motor is bad?
Primary warning signs include loss of output torque or speed under load, unusual noise (grinding or knocking), visible external leaks, excessive case drain flow, and overheating. A pressure and flow test can confirm internal bypass.
What is the life expectancy of a hydraulic motor?
Hydraulic motor lifespan depends on fluid cleanliness, operating pressure, duty cycle, and maintenance quality. Motors running clean fluid (ISO 18/16/13 cleanliness code) can exceed 10,000 operating hours; contaminated systems can cut that figure dramatically.
What tools do you need to rebuild a hydraulic motor?
Essential tools include a torque wrench, seal driver set, snap ring pliers, micrometer or dial bore gauge, feeler gauges, cleaning solvent, and the manufacturer's service manual. Improvised tools risk damaging precision components.
How long does it take to rebuild a hydraulic motor?
An experienced technician typically needs several hours to a full day, depending on motor size and parts availability. Factor in additional time for the graduated break-in test before returning the motor to full-load service.
Need professional help with your hydraulic motor rebuild? Hydrostatic Transmission Service rebuilds hydraulic motors from Parker, Eaton, Rexroth, Danfoss, Vickers, Kawasaki, and more. Our team carries over 100 years of combined experience, and every rebuild is backed by a 1-year warranty. Our Short-Time Exchange Program gets a tested, ready-to-install unit to you fast — reducing downtime while your core is being rebuilt. Call (800)-361-0068 or email sales@htsrepair.com to get started.