Introduction
A failing hydraulic pump doesn't announce itself cleanly. You get sluggish 3-point hitch response, loader arms that drift under load, or steering that suddenly feels like work. Left undiagnosed, those symptoms can shut down field operations for days during planting or harvest.
This guide walks you through three practical testing methods—visual checks, pressure gauge tests, and flow meter tests—so you can accurately diagnose pump problems. You'll learn how to read test results, distinguish between pump failure and other system issues, and decide whether a simple fix or pump replacement is needed.
Key Takeaways
- Testing requires checking pressure, flow, and observable symptoms together—not just one measurement
- Three methods: visual checks (no tools), pressure gauge test (accessible), and flow meter test (definitive)
- A pump reaching rated pressure at low load but losing flow under pressure indicates internal wear
- Essential tools: pressure gauge rated above system max, service manual for specs, flow meter for conclusive diagnosis
- Confirmed pump failure means rebuild or replacement; exchange programs like the one offered by Hydrostatic Transmission Service reduce downtime with tested, warranted units
What You Need to Test a Tractor Hydraulic Pump
Having the right tools and proper setup before testing prevents false readings, safety risks, and wasted time.
Tools and Equipment Required
Core testing tools:
- Pressure gauge rated above your tractor's maximum system pressure (typically 3,000+ PSI)
- Flow meter — optional for basic checks, but required for a definitive pump diagnosis
- Service manual or manufacturer spec sheet with rated pressure and flow values for your model
- Infrared thermometer to monitor hydraulic fluid temperature
- Clean rags and an oil catch pan for fluid handling
Preconditions and Setup
Before connecting any test equipment:
- Park the tractor on flat, stable ground
- Shut off the engine completely
- Lower all raised implements to the ground
- Relieve residual hydraulic pressure from the system
- Check hydraulic fluid level and condition—contaminated or low fluid skews results
- Warm the system to normal operating temperature before testing (see note below)
Temperature note: Cold oil has higher viscosity, which inflates flow readings and hides internal wear. The OECD Code 2 standard requires 149°F ± 9°F (65°C ± 5°C) for accurate results. Run the tractor under load for at least 15 minutes before testing.
Three Methods to Test a Hydraulic Pump on Your Tractor
Multiple testing methods exist, ranging from no-tool visual checks to instrument-based tests. The right method depends on available tools and the certainty level needed. Use all three together for the most reliable diagnosis.
Method 1: Visual and Observational Check
This method identifies obvious failure symptoms without measuring pressure or flow. It helps rule out non-pump causes and flags clear signs of pump distress before reaching for instruments.
Step-by-step process:
Operate hydraulics under load: With the engine running, cycle the 3-point hitch or loader through its full range. Observe response speed and smoothness—sluggish or jerky movement indicates problems.
Listen for abnormal sounds: Whining or rattling from the pump area indicates cavitation or air ingestion. Grinding suggests internal wear. Normal pumps run with a steady hum.
Inspect for external leaks: Check the pump body, shaft seal, and hose connections for hydraulic fluid leaks. Fresh oil spots or wet fittings point to seal or connection failures.
Pros: Quick, requires no tools, rules out obvious non-pump issues like low fluid or leaking lines.
Cons: Cannot confirm internal pump wear. Always follow with instrument-based testing when problems are suspected.
Method 2: Pressure Gauge Test
This method measures whether your tractor's hydraulic system reaches and holds its rated operating pressure. It identifies pressure loss from pump wear, relief valve issues, or internal leakage. Note that pressure alone doesn't confirm adequate flow—a worn pump can reach rated pressure while delivering insufficient volume.
Tools needed:
- High-pressure hydraulic test gauge rated above your tractor's maximum system pressure
- Gauge port adapter fitting compatible with your tractor's test port (refer to service manual for location and thread type)
Step-by-step process:
Connect the pressure gauge to the hydraulic test port on the pump outlet or as specified in your service manual. Ensure the relief valve is initially set to low pressure.
Warm the system by starting the engine and bringing hydraulics to operating temperature. Observe baseline pressure at idle.
Test under load: Engage a hydraulic function (such as raising the loader fully against resistance) and record the pressure reading. Compare this to your manufacturer's rated system pressure.
Representative pressure ranges:
- Compact utility tractors (25-60 HP): 2,000-2,500 PSI
- Utility tractors (60-120 HP): 2,500-2,900 PSI
- Large row-crop tractors (120-300+ HP): 2,800-3,000 PSI
Always verify your specific tractor's rated pressure in the service manual.
Pros: Accessible test requiring minimal specialized equipment.
Cons: A pump can reach rated pressure while still bypassing internally—a passing pressure reading doesn't always mean the pump is healthy.
Method 3: Flow Meter Test (Definitive)
This test measures whether the pump delivers its rated flow volume under actual system pressure. A pump that flows adequately at low load but loses flow as pressure increases has internal wear or bypassing.
Tools needed:
- Calibrated flow meter rated for your tractor's system pressure
- Isolation valve or hand valve to block downstream flow
- Pressure gauge to monitor simultaneously
Step-by-step process:
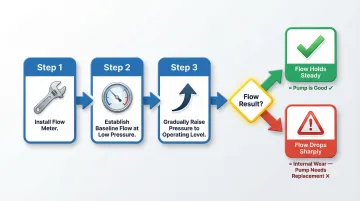
Install the flow meter in the pressure line between the pump outlet and relief valve (or in the relief valve tank line where accessible). Set the relief valve to low pressure before starting.
Establish baseline flow: Start the engine and observe flow on the meter at low pressure. For variable-displacement pumps, set the compensator to full displacement so the pump behaves like a fixed-displacement unit during testing.
Test under pressure: Gradually raise the relief valve pressure setting toward normal system operating pressure while watching the flow meter.
- Flow holds steady at rated pressure: Pump is good
- Flow drops significantly as pressure increases: Internal wear is present; pump needs replacement
Representative flow rates:
- Compact utility tractors: 10-12 GPM
- Utility tractors (60-120 HP): 11-12 GPM
- Large row-crop tractors (120-300+ HP): 55-60 GPM
Pros: The only method that definitively confirms whether a pump is good or bad.
Cons: Requires a flow meter investment and is less practical for quick field diagnosis.
How to Interpret Your Test Results
Reading test results correctly is critical. Misinterpreting normal readings leads to unnecessary pump replacement; missing a genuine failure means running a damaged pump until it takes other components with it.
Results typically fall into one of three categories: normal, minor issues, or confirmed failure. Each calls for a different response.
Normal/Acceptable Results
The pump reaches or is within 5% of its rated system pressure (find the specific PSI value in your tractor's service manual), and flow remains near the rated volume even as pressure is raised to operating levels. No abnormal noise, no excessive heat, no visible leaks.
Next step: Continue regular monitoring and maintain the hydraulic system according to manufacturer intervals.
Minor Issues
Pressure builds but is slightly below spec, or flow drops marginally under load. This may indicate:
- Early internal wear
- Partially clogged suction screen
- Low fluid level
- Relief valve set slightly low
Next step: Check and correct fluid level, clean or replace suction filter, verify relief valve setting, and re-test before declaring the pump failed.
Out-of-Spec (Confirmed Failure)
Flow drops sharply as pressure increases, pressure fails to reach rated value under load, or the pump exhibits excessive heat, loud cavitation noise, or continuous bypassing. These symptoms confirm internal pump wear or damage.
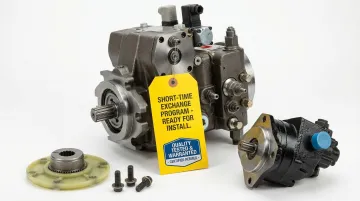
Next step: Remove the pump for inspection and rebuild or replace it. Hydrostatic Transmission Service's Short-Time Exchange Program offers rebuilt replacement units tested to manufacturer specifications with a one-year warranty, so tractor downtime stays short.
Common Mistakes When Testing a Tractor Hydraulic Pump
Testing with cold hydraulic fluid: Cold oil is thicker and masks real flow and pressure performance. Start the test before the system reaches operating temperature and you'll get artificially low readings. Always warm the system first.
Relying only on pressure readings: A pump can reach rated pressure at low flow and still be severely worn, with internal bypassing going completely undetected. Include flow measurement in every pump test — pressure alone won't catch a worn pump.
Overlooking the relief valve and other system components: A stuck-open or incorrectly set relief valve produces the same symptoms as a failed pump — low pressure and weak lift. Before condemning the pump, verify the relief valve is functioning correctly and inspect hoses, filters, and seals as potential alternate causes.
Safety and Best Practices When Testing
Isolation and Pressure Relief
Before connecting or disconnecting any gauges or fittings, shut off the engine completely, lower all raised implements to the ground, and relieve residual hydraulic pressure. Never work on a pressurized hydraulic line. Hydraulic fluid injected through the skin at pressures as low as 100 PSI is a medical emergency that can require amputation if surgical debridement is delayed beyond 6 hours.
Personal Protective Equipment and Work Area
Wear safety glasses and hydraulic-rated gloves during testing. Secure all hose connections with proper fittings rated for the system's maximum pressure. Keep bystanders away from the test area—a failed fitting under pressure can cause serious injury.
Fluid Cleanliness and Documentation
Use clean tools and fittings when connecting test equipment to prevent contaminating the hydraulic system. Record test results including:
- Pressure readings
- Flow values
- Fluid temperature
- Engine RPM
Tracking these readings over time lets you spot gradual pump decline before it becomes a breakdown during planting or harvest—when downtime costs the most.
Frequently Asked Questions
Frequently Asked Questions
How do I know if my hydraulic pump is bad on my tractor?
Common warning signs include:
- Sluggish or non-responsive 3-point hitch or loader
- Whining or grinding noises from the pump area
- Visible hydraulic fluid leaks near the pump
- Loss of steering assist
Confirm any of these symptoms with a pressure or flow test before replacing the pump.
What are four things that require testing in a hydraulic system?
Test pump pressure output, pump flow volume, relief valve operation and pressure setting, and fluid condition (viscosity and contamination level). Testing all four together is the only way to distinguish a failing pump from a relief valve issue or contaminated fluid.
What will happen if there is air trapped in the hydraulic system?
Trapped air causes erratic, spongy, or jerky hydraulic movement. It accelerates pump wear through cavitation—air bubbles collapsing under pressure damage internal surfaces. The system will overheat, and symptoms are often mistaken for pump failure.
How many psi are tractor hydraulics?
Tractor hydraulic system pressure varies by make, model, and function. Compact utility tractors typically operate at 2,000–2,500 PSI, while large row-crop tractors operate at 2,800–3,000 PSI. Always refer to your specific tractor's service manual for the correct rated pressure before testing.
Can I test a tractor hydraulic pump without a flow meter?
Yes, a pressure gauge test and observational checks can identify many problems, but they cannot conclusively confirm a pump is good. A pump can pass a pressure-only test while still bypassing internally. For conclusive diagnosis, a flow meter test is necessary.
How often should I test my tractor's hydraulic pump?
Perform a baseline test during annual service or at the start of heavy-use seasons. Conduct additional checks any time symptoms like sluggish response, unusual noise, or overheating appear. Logging results from each test helps you catch gradual decline before it turns into an unplanned failure.