Introduction
The dump trailer hydraulic pump is the core component that powers the raise-and-lower function of a dump trailer's bed, making it essential for loading and unloading operations on job sites. When this 12V DC-powered unit fails, the entire operation grinds to a halt—costing time, money, and productivity.
Most pump failures follow predictable patterns. Common symptoms include:
- Bed won't lift under load
- Whining or grinding noises during operation
- Fluid leaks around fittings
- Motor runs but the bed doesn't move
These problems typically trace back to electrical faults (weak battery or failed solenoid coils), contaminated or low hydraulic fluid, or worn internal components. Most can be resolved without a full replacement — if diagnosed correctly.
This guide covers the most common failure symptoms, their root causes, a step-by-step repair process, a fix-vs-replace decision framework, and preventive maintenance practices. Whether you're diagnosing a pump in the field or weighing a rebuild against a full replacement, the sections below give you a clear path forward.
Key Takeaways
- Dump trailer pump failures follow four patterns: slow/no lift, bed won't lower, abnormal noise, and fluid leaks or overheating
- Most failures trace to low battery voltage, contaminated hydraulic fluid, or a failed solenoid coil
- Repairs follow four steps: identify the symptom, isolate electrical vs. hydraulic cause, apply the fix, then test under load
- Replace rather than repair when internal pump damage is widespread, the unit has exceeded its service life, or downtime cost outweighs repair cost
- Preventive maintenance—checking battery voltage, fluid level, and hose condition before each use—prevents most failures before they occur
What Is a Dump Trailer Hydraulic Pump?
A dump trailer hydraulic pump is a 12V DC-powered unit that converts electrical energy into hydraulic pressure. The system uses an electric motor to drive a small external gear pump, which forces hydraulic fluid from the reservoir into hydraulic cylinders, physically lifting and lowering the dump bed. These compact units deliver 1.6 kW to 2.2 kW of power and are designed for mobile, battery-powered operation.
Single-Acting vs. Double-Acting Configurations
Dump trailers use one of two hydraulic circuit designs:
| Configuration | How It Works | Common Applications |
|---|---|---|
| Single-Acting | Hydraulic pressure extends the cylinder to lift the bed; gravity retracts it to lower the bed | Lighter trailers where controlled lowering isn't required |
| Double-Acting | Hydraulic pressure is used for both lifting and lowering, providing controlled descent | Heavier trailers or applications requiring precise bed control |
Identifying your trailer's configuration is the first step in diagnosing lowering failures and establishing correct fluid fill procedures.
Key System Components
The hydraulic pump doesn't work alone. A complete 12V DC dump trailer hydraulic system includes:
- Electric motor – Powers the gear pump
- Gear pump – Generates hydraulic pressure
- Reservoir – Stores hydraulic fluid (steel or plastic tank)
- Solenoid valve manifold – Controls fluid flow for up and down functions
- Relief valve – Prevents over-pressurization
- Check valves – Control fluid direction
- Suction filter/strainer – Filters fluid before it enters the pump
- Hydraulic cylinders – Convert hydraulic pressure into mechanical lifting force
- Hoses and fittings – Connect all components
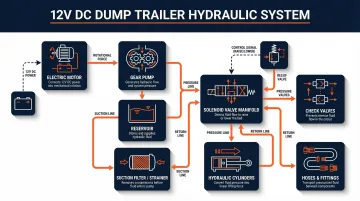
Failure in any one of these components can mimic a pump failure — which is why pinpointing the actual fault before pulling parts saves both time and money.
Common Problems With Dump Trailer Hydraulic Pumps
Most dump trailer hydraulic pump failures present as one of four recognizable patterns. Knowing which pattern you're dealing with before reaching for tools saves time and avoids misdiagnosis.
Problem 1: Pump Won't Lift or Lifts Weakly Under Load
Symptoms:
- Dump bed rises extremely slowly
- Bed stalls partway up when loaded
- Bed refuses to lift at all
- Motor runs but bed doesn't respond
Likely Causes:
Low battery voltage is the single most common cause. HydraForce specifications indicate that solenoid valves require at least 85% of nominal voltage (approximately 10.2V for a 12V system) for reliable operation. When voltage drops below this threshold, solenoid valves can't open fully, starving the cylinders of pressure.
Other causes include:
- Low fluid level causing cavitation
- Stuck or improperly-set relief valve bleeding off pressure
- Internal pump wear reducing output
- Clogged suction strainer restricting fluid flow
Problem 2: Pump Runs But Bed Won't Come Down
Symptoms:
- Bed lifts normally but fails to lower when down button is pressed
- Clicking sound may be heard but no movement occurs
- Bed is stuck in the raised position
Likely Causes:
The "down" solenoid coil has failed or is not receiving voltage. This is one of the most common solenoid-specific failures. The coil may have burned out due to sustained low voltage operation, or debris may have caused the internal valve spool to stick.
Temporary Field Fix:
OEMs including Buyers Products and PJ Trailers explicitly endorse swapping identical coils as a recognized field diagnostic. If your pump uses identical coils for up and down functions, swap them. If the bed then lowers but won't raise, you've confirmed a faulty down coil. This workaround gets the bed down in the field, then replace the faulty coil.
Problem 3: Abnormal Noise During Operation
Symptoms:
- Squealing or whining sound
- Grinding or knocking noise
- "Gurgling" or "bubbling" sound
- Vibration in pump body or hoses
Likely Causes:
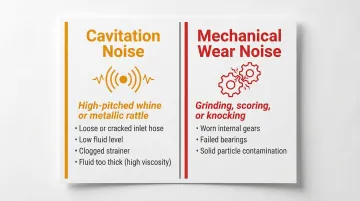
Noise type points directly to the root cause. Use this quick reference:
| Noise Type | How It Sounds | Common Causes |
|---|---|---|
| Cavitation | High-pitched whine or metallic rattle (like "gravel in a can") | Loose/cracked inlet hose, low fluid level, clogged strainer, fluid too thick for temperature |
| Mechanical wear | Grinding, scoring, or knocking | Worn internal gears, failed bearings, solid particles circulating through pump |
Problem 4: Hydraulic Fluid Leaks or Overheating
Symptoms:
- Oil stains around pump body, reservoir, hoses, or fittings
- Reservoir level dropping between uses
- Pump or fluid running unusually hot after short operation
- Fluid forced out of breather cap in severe cases
Likely Causes:
Leaks are most often caused by:
- Aged or damaged seals and O-rings
- Loose connection fittings
- Cracks in pump housing
- Over-pressurization stretching valve tubes
Overheating typically results from:
- Prolonged overload operation
- Contaminated or degraded hydraulic fluid reducing lubrication
- Partially blocked return line
- Relief valve set too close to operating pressure, causing continuous fluid bypass
Standard Nitrile (Buna-N) seals degrade above 210°F, leading to hardening and leaks. Upgrading to Fluorocarbon (Viton) seals extends thermal resistance up to 300°F for high-duty-cycle applications.
How to Fix a Dump Trailer Hydraulic Pump: Step-by-Step
Fixing a pump without isolating the root cause first leads to wasted parts and repeat failures. Follow this sequence to apply the right fix the first time.
Step 1: Identify the Exact Problem
Document visible symptoms:
- Check for fluid around pump, hoses, and fittings
- Listen for unusual sounds (whining, grinding, gurgling)
- Note whether motor runs or is completely dead
- Record when problem occurs (startup, under load, during lowering, continuously)
Measure battery voltage:
Use a multimeter to check voltage at two critical points:
At-Rest Voltage:
- A fully charged 12V lead-acid battery should read 12.6V to 12.8V after resting with no load
- Readings below 12.4V indicate battery must be recharged before testing
Under-Load Voltage:
- During a 15-second load test at 50% of the battery's Cold Cranking Amps rating, voltage must not drop below 9.6V at 70°F
- Voltage below 10.2V under operational load will cause solenoid valves to fail or operate erratically
Weak battery voltage is the most commonly overlooked root cause and must be ruled out first.
Step 2: Confirm the Root Cause Category
Determine whether the issue falls into an electrical/control category or a hydraulic/mechanical category:
Electrical/Control Issues:
- Battery voltage too low
- Solenoid coil failure
- Wiring damage or poor ground connection
- Failed relay or remote control
Hydraulic/Mechanical Issues:
- Low or contaminated fluid
- Relief valve stuck or misadjusted
- Worn seals or O-rings
- Internal pump damage (gears, bearings)
- Clogged strainer or breather
Treating a hydraulic symptom with an electrical fix (or vice versa) wastes time and risks further damage.
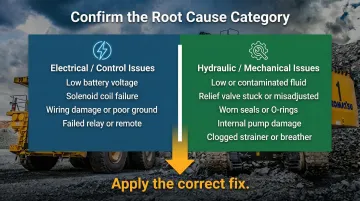
Step 3: Apply the Correct Fix
If the Issue Is Electrical (Battery, Solenoid, or Wiring)
Battery and Wiring Checks:
- Load-test the battery using the SAE J537 standard procedure
- Clean corroded terminals and verify chassis ground connection is tight
- Test for voltage at solenoid terminals while pressing up and down buttons
- If "up" solenoid clicks but "down" coil shows no magnetism when a metal tool is held nearby, the down coil has failed
Solenoid Coil Replacement:
- Replace the faulty coil with an OEM-specification replacement
- If coils are identical, swap them temporarily to confirm diagnosis and get the bed down in the field
- Check for "trickle voltage" that prevents the valve from fully disengaging—voltage must drop below 5% of nominal to reliably disengage
When electrical checks come back clean, the fault lies in the hydraulic or mechanical side of the system.
If the Issue Is Hydraulic or Mechanical (Fluid, Seals, Valves, Pump Internals)
Disassembly and Inspection:
- Safely disconnect power and drain all hydraulic fluid into appropriate container
- Disassemble pump in component order—photograph each stage for reassembly reference
- Inspect seals, O-rings, and gaskets for cracking, hardening, or deformation
- Check relief valve setting and inspect check valves for debris
- Examine gear teeth for scoring, pitting, or wear
- Check pump housing for cracks
Cleaning and Reassembly:
- Clean all components with appropriate solvent
- Replace all damaged seals, O-rings, and gaskets
- Reassemble with new gaskets seated correctly
- Refill with correct fluid type to proper level
Fluid Type and Fill Level:
OEMs specify different fluid types depending on manufacturer. Check your owner's manual before filling — using the wrong fluid can damage seals and reduce pump life:
- Some specify AW46 hydraulic oil
- Others recommend AW32
- Some (like certain models) specify automatic transmission fluid (Dexron III)
Critical Fill Procedure:
- The dump bed must be fully lowered (cylinder fully retracted) before filling the reservoir
- Fill to the "Full Line" or approximately 1/2 inch to 1 inch from top of tank
- Never fill with cylinder extended—this will cause overflow and aeration during retraction
Step 4: Test and Validate the Fix
No-Load Test:
- Reconnect power and refill to correct fluid level
- Perform test cycle with bed empty
- Verify pump starts cleanly
- Confirm both up and down functions respond
Loaded Test:
- Load trailer to typical working weight
- Monitor lift speed and descent control
- Listen for unusual noise or vibration
- Inspect all connection points for leaks after pressurization
- Monitor fluid temperature and level over first several operating cycles
If the issue recurs after completing all four steps, return to Step 1. A repeat failure means the original root cause was not fully resolved — resist the temptation to re-apply the same fix.
When Should You Repair vs. Replace Your Dump Trailer Hydraulic Pump?
The repair-vs-replace decision hinges on three factors: the location and severity of the failure, the pump's overall service history and age, and the cost of downtime. A localized, easily accessible fault almost always favors repair, while systemic or internal damage shifts the math toward replacement.
Here's how each failure type typically plays out.
Scenario 1: Electrical Fault (Solenoid Coil, Wiring, or Battery)
Fix:
- Replace the specific solenoid coil ($20-$50)
- Repair wiring or improve ground connections
- Replace or recharge battery
- These are low-cost, high-return repairs that rarely require pump disassembly
Replace:
- Only if the entire manifold valve block has failed
- Or if multiple solenoids have failed simultaneously due to sustained electrical damage
Scenario 2: Hydraulic Fluid Leak from Seals or Fittings
Fix:
- If leaks are limited to external seals, O-rings, or loose fittings
- A seal kit replacement ($30-$80) is cost-effective and straightforward
- Pump must have reasonable service life remaining
Replace:
- If pump housing itself is cracked
- If repeated seal replacements have not resolved persistent leaks, pointing to dimensional wear in pump bore
Scenario 3: Internal Mechanical Wear (Gears, Bearings, Worn Pump Body)
Fix:
- If wear is localized to specific components
- OEM-specification replacement parts are available
- A full internal rebuild can restore pump performance
- This scenario benefits most from professional rebuild expertise
Replace:
- If internal wear is widespread
- Pump has exceeded expected service life (typically 3,000-5,000 operating hours)
- Rebuild parts are unavailable or cost-prohibitive
For operators who cannot afford extended downtime, a quality-rebuilt exchange unit is often the fastest path back to operation. Hydrostatic Transmission Service offers a Short-Time exchange program with units rebuilt and tested to manufacturer specifications, backed by a 1-year warranty — restoring operation faster than a full in-field rebuild.
Scenario 4: Pump Fails Immediately or Repeatedly After Repair
Fix:
- Return to diagnosis—repeated failures indicate root cause was not properly isolated
- Inspect for contamination that damaged new components
- Verify correct fluid type and fill procedure
- Check that battery voltage remains above 10.2V under load
Replace:
- If pump has failed multiple times in short period despite correct repairs and fluid maintenance
- Unit has likely reached end of service life
- Replacement is more cost-effective long-term decision
Preventive Maintenance to Avoid Future Pump Failures
Most dump trailer hydraulic pump failures are preventable — nearly all trace back to neglected fluid maintenance or ignored early warning signs.
Common Mistakes to Avoid When Repairing the Pump
Treating symptoms instead of root cause — replacing a solenoid when the real issue is low battery voltage, swapping fluid when a failed relief valve is the culprit, or installing new seals into a contaminated system that will destroy them immediately.
Skipping the loaded test — a pump that works with an empty bed may still fail under real operating weight. Always test with a typical load before calling the repair complete.
Using incompatible components — incorrect seal materials that fail at operating temperatures, wrong fluid viscosity for the climate, or non-OEM relief valves set to different pressure ratings.
Preventive Actions to Implement
Establish a Pre-Use Checklist:
Before each use, verify:
- Battery voltage: Fully charged battery should read 12.6V to 12.8V at rest
- Hydraulic fluid level: Check with bed in down position—level should be at "Full Line"
- Visual inspection: Look for leaks, hose abrasion, loose fittings, or damaged components
- Breather cap: Ensure it's not clogged or plugged—a blocked breather creates vacuum that restricts flow and causes cavitation
Fluid Maintenance Schedule:
Replace hydraulic fluid and clean or replace strainer/filter on manufacturer's recommended interval:
- First change: After 100 hours of use or 6 months to 1 year
- Subsequent changes: Every 3,000 operating hours
- Earlier service warranted if fluid appears dark, cloudy, or contaminated
Contaminated fluid accelerates internal wear fast — particles score gear teeth and cause valve spools to stick, turning a maintenance issue into a full pump replacement.
Viscosity Selection by Temperature:
| Ambient Temperature | Recommended Fluid | Notes |
|---|---|---|
| -20°F to +32°F | ISO VG 15 | Required for extreme cold to prevent thick-fluid cavitation |
| +14°F to +120°F | ISO VG 22, 32, or ATF (Dexron III) | AW32 ideal for cooler months; AW46 suited for summer heat |

Keep System Clean:
- Keep area around pump and reservoir clean to prevent dirt ingestion through seals and breather cap
- A plugged or dirty breather can cause pressure spikes that crack the reservoir or force fluid out during operation
- Clean quick-disconnect couplers before connecting hoses
Frequently Asked Questions
Can a dump trailer hydraulic pump be repaired?
Yes, most dump trailer hydraulic pumps can be repaired—especially when the fault is limited to solenoid coils, seals, or fluid contamination. Electrical failures (battery, solenoid, wiring) are straightforward fixes that rarely require disassembly. Pumps with widespread internal mechanical wear may be better candidates for professional rebuild or exchange.
How can I tell if a dump trailer hydraulic pump is bad?
Key warning signs include: the bed won't lift or lifts very slowly under load, the motor runs but no movement occurs, abnormal noise (whining, gurgling, or grinding) is present during operation, or hydraulic fluid is visibly leaking around the pump, hoses, or fittings. Measure battery voltage first—readings below 10.2V under load will cause symptoms that mimic pump failure.
What is the most common cause of dump trailer hydraulic pump failure?
A weak or undercharged battery is the most frequently overlooked root cause. Insufficient voltage prevents solenoid valves from opening fully and causes high amperage draw that burns up coils and motors. Other common causes include contaminated hydraulic fluid, worn internal seals, and clogged suction strainers.
What kind of hydraulic fluid should I use in a dump trailer hydraulic pump?
Fluid type varies by trailer manufacturer—some specify AW46 hydraulic oil, others AW32, and some automatic transmission fluid (Dexron III). Always consult your owner manual before filling, as using the wrong viscosity for your climate causes cavitation and sluggish operation.
How often should I service my dump trailer hydraulic pump?
Check fluid level and battery voltage before each use. Perform a full fluid change and strainer inspection after the first 100 hours of use (or 6 months to 1 year), then every 3,000 operating hours thereafter. Service earlier if fluid appears dark, cloudy, or contaminated.
When should I call a professional for dump trailer hydraulic pump repair?
Call a professional when leaks persist after seal replacement, when the pump fails to build pressure despite correct electrical checks, when internal components require precision measurement, or when a rebuilt exchange unit offers the fastest path back to operation. Internal rebuilds require specialized testing equipment and controlled conditions not available in the field.