Introduction
The Rogator self-propelled sprayer is a critical piece of agricultural equipment where wheel motors—hydraulic motors that drive each wheel independently—are central to field performance and mobility. These motors convert hydraulic pressure from the machine's hydrostatic drive system into rotational torque, propelling the sprayer across diverse terrain and field conditions.
Wheel motor failures are among the most disruptive problems a Rogator operator can face — especially mid-season, when downtime directly cuts into application windows and crop protection schedules. Most failures trace back to one of four root causes:
- Hydraulic contamination scoring internal surfaces
- Seal wear from degraded or contaminated fluid
- Overloading during heavy field conditions
- Missed maintenance intervals that let minor issues escalate into full motor failures
This guide covers the most common Rogator wheel motor problems, diagnostic steps, and a clear repair process — including how to decide whether a motor is worth rebuilding or needs replacing. Knowing the difference between a repairable seal leak and internal bypass damage can save thousands of dollars before the next spray window closes.
Key Takeaways
- Most common issues: loss of drive to a wheel, external leaks, overheating, and abnormal noise during operation
- Early detection allows repair; severe internal damage requires replacement or a professional rebuild
- Always diagnose the root cause first; skipping this step leads to repeat failures
- A tested exchange unit gets you back in the field faster than sourcing individual parts mid-season
What Is a Rogator Wheel Motor?
A Rogator wheel motor is a hydraulic motor integrated into each wheel hub of the sprayer, converting hydraulic pressure from the machine's hydrostatic drive system into rotational torque that propels the machine across the field. Modern Rogator models use a tandem hydrostat cross-drive system that drives the hydraulic motors in a cross pattern, ensuring evenly distributed flow and consistent traction across all four wheels.
Each wheel motor operates as part of a closed-loop hydraulic circuit, so a failure in one motor affects the balance and performance of the entire drive system. This interconnected design makes early diagnosis essential.
A single failing motor can trigger a cascade of problems:
- Pulls the sprayer to one side, reducing application accuracy
- Causes the machine to bog down in soft field conditions
- Spreads contamination to other motors sharing the same circuit
- Creates charge pressure drops that impact all four wheel motors simultaneously
Common Problems With Rogator Wheel Motors
Most Rogator wheel motor failures follow predictable patterns. Recognizing symptoms early prevents further damage to the broader hydraulic system — and avoids turning a simple seal repair into a full motor replacement.
Loss of Drive to One or More Wheels
Symptoms: One wheel fails to rotate or has significantly reduced torque, causing the machine to pull to one side or lose forward traction—especially under load in soft field conditions.
Likely cause: Internal hydraulic bypass due to worn pistons or a damaged valve plate, allowing fluid to circulate internally without generating drive torque. The valve plate connects one half of the cylinder block to high pressure and the other half to low pressure. When abrasive contaminants score these surfaces, the gap widens and high-pressure fluid bypasses the pistons — directly reducing output speed and torque.
Low charge pressure reaching that specific motor is a secondary cause worth checking before disassembly.
Hydraulic Fluid Leaking From the Wheel Motor
Symptoms: Visible fluid pooling at the wheel hub area, drop in hydraulic reservoir level, or wet/oily buildup around the motor housing or shaft seal.
Likely cause: Worn shaft seals, O-ring failures, or a cracked motor housing — often accelerated by contaminated fluid degrading seal materials early. External leakage is rarely a standalone seal failure. When worn pistons allow too much fluid into the motor case, the case drain lines can't keep up, case pressure spikes, and shaft seals blow out.
Overheating of the Wheel Motor or Hydraulic Fluid
Symptoms include high hydraulic fluid temperature warnings on the machine display, excessive heat radiating from the wheel hub area, or reduced drive performance once the system is fully warmed up.
Likely causes:
- Excessive internal leakage forcing the hydraulic pump to work harder to maintain output
- Blocked case drain line restricting cooled fluid return to the reservoir
- Sustained operation in conditions exceeding the motor's rated load
Abnormal Noise (Grinding, Whining, or Knocking)
Symptoms include metallic grinding or whining during operation that increases with load or wheel speed, and knocking sounds on startup or direction changes.
Likely causes:
- Worn or scored bearing surfaces inside the motor
- Cavitation from inadequate charge pressure
- Metal contamination circulating after an internal failure event
Danfoss technical literature identifies excessive noise in the pump, foaming in oil, and hot oil as primary indicators of cavitation or air in the system.
Why Rogator Wheel Motors Fail
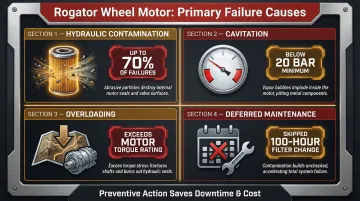
Four primary real-world conditions cause most Rogator wheel motor failures:
- Hydraulic fluid contamination — the leading cause, responsible for up to 70% of hydraulic system failures. Abrasive particles act like sandpaper between the valve plate and cylinder block, widening clearances, degrading seals, and causing internal bypass.
- Cavitation — insufficient charge pressure starves the motor of fluid, causing implosion damage. AGCO explicitly mandates a minimum boost pressure of 20 bar at startup for the RoGator 418, warning operators to "stop engine if the boost pressure is lower than the minimum value or if the reading fluctuates."
- Overloading — sustained torque beyond motor ratings during heavy field conditions. Soft soil, steep slopes, or high-speed operation with full tanks all push motors past their design limits.
- Deferred maintenance — skipped fluid changes, filter neglect, or ignored early leaks allow problems to compound. The initial 100-hour filter change is the most critical maintenance event in the machine's life, removing manufacturing debris and break-in wear metals before they can damage the valve plates.
Any of these failure modes can escalate quickly. A minor seal leak or slight pressure drop left unchecked can progress to full bearing or valve plate failure — turning a low-cost repair into a complete motor rebuild.
Rogator wheel motor failures rarely occur in isolation. Contamination that damages one motor likely affects others in the same circuit, and charge pressure issues will hit all wheel motors simultaneously.
How to Troubleshoot and Fix a Rogator Wheel Motor Step-by-Step
Attempting repairs before confirming the exact problem leads to unnecessary part replacements, repeat failures, and extended downtime. Each step below builds on the last — skip one and you risk misdiagnosing the cause entirely.
Step 1: Identify the Exact Problem
Visual inspection:
- Check for fluid leaks at each wheel motor
- Inspect hose connections for swelling, cracking, or seepage
- Look for physical damage or unusual wear patterns
- Note any warning codes on the machine's display
Operational test:
- Test drive at low speed on flat ground
- Observe if the machine pulls to one side
- Check if one wheel is unresponsive or sluggish
- Listen for noise under load
- Note if performance degrades once the system reaches operating temperature
Step 2: Confirm the Root Cause Before Acting
Check system charge pressure:
- Use a hydraulic pressure gauge on the motor's inlet port
- Compare the reading against the Rogator service manual specification
- AGCO requires a minimum of 20 bar at startup
- Low charge pressure across all motors points to pump or filter issues, not the motors themselves
Perform a case drain flow test:
- Temporarily redirect the case drain line into a container
- Measure flow rate during operation
- Excessive case drain flow above manufacturer spec confirms significant internal motor bypass and indicates internal wear
- If flow is excessive, the motor requires internal repair or replacement
Rule out external factors:
- Verify hydraulic fluid level and condition
- Check for milky appearance (water contamination)
- Look for dark or metallic fluid (internal wear debris)
- Inspect suction filters for clogging
Step 3: Apply the Correct Fix Based on the Diagnosis
For external leaks (seal/O-ring failure):
- Carefully disassemble the motor end cap or shaft seal area
- Replace all seals with manufacturer-spec seal kits
- Inspect the sealing surfaces for scoring that would cause a new seal to fail immediately
- Flush the area thoroughly before reassembly
For internal wear (low drive torque, excessive case drain flow):
Full disassembly is required. Work through each component systematically:
- Inspect pistons, cylinder block, valve plate, and bearings for scoring or wear beyond tolerance
- Replace worn components that fall outside spec and reassemble if damage is isolated
- If multiple components show significant wear, sourcing, measuring, and machining parts to precise tolerances adds time most operations can't afford
- In that case, a professional rebuild or exchange unit is the faster path back to the field — Hydrostatic Transmission Service's Short-Time exchange program supplies fully rebuilt, tested, and warranted units with a 1-year warranty
For overheating root cause:
- Inspect and clear the case drain line for restrictions
- Check and service the hydraulic cooler
- Verify that system relief pressure settings haven't drifted above spec
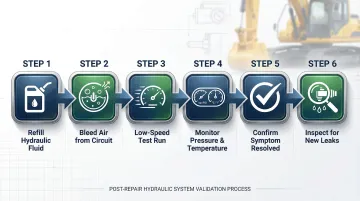
Step 4: Reassemble, Refill, and Test
After any repair:
- Refill the hydraulic system with the correct fluid type and grade per the Rogator operator manual
- Bleed any trapped air from the wheel motor circuit
- Run the machine at low speed before applying full load
- Monitor charge pressure, case drain temperature, and drive performance under gradually increasing load
- Confirm the original symptom is resolved
- Watch for any new fluid leaks at disturbed connections
When to Repair vs. Replace Your Rogator Wheel Motor
The repair-versus-replace decision comes down to three factors: the extent of internal damage found during diagnosis, the cost of parts and labor relative to a tested exchange unit, and the urgency of getting the machine back in the field.
Repair is appropriate when:
- The failure is isolated to external seals or O-rings with no internal scoring
- Charge pressure and internal clearances are within spec
- The motor housing is undamaged Seal kits for these repairs are widely available, and turnaround is typically fast.
Replace or professionally rebuild when:
- Case drain flow tests confirm severe internal bypass
- Multiple internal components (pistons, valve plate, bearings) show measurable wear beyond tolerance
- The motor has suffered a contamination event Piecemeal repair in these situations carries a high risk of repeat failure — often costing more than a full rebuild the first time around.
When the damage runs deep, a professional exchange unit gets the machine back in the field faster than sourcing and machining individual worn components. Hydrostatic Transmission Service's exchange program provides units rebuilt and tested to manufacturer specifications, backed by a 1-year warranty — reducing downtime during critical spraying windows.
Common repair mistakes to avoid:
- Skipping the case drain flow test and guessing at internal condition
- Installing a new motor without flushing contaminated hydraulic fluid (which will destroy the new motor quickly)
- Reusing seals or O-rings on reassembly
- Failing to address the root cause that damaged the original motor
Preventive Maintenance to Avoid Future Wheel Motor Failures
Most premature Rogator wheel motor failures are preventable — consistent maintenance during the off-season is far cheaper than emergency repairs mid-application.
Key preventive actions:
Hydraulic Fluid and Filter Service Intervals
- Initial filter service: 100 hours
- Recurring filter service: Every 500-1,000 hours (depending on model)
- Recurring fluid change: Every 1,000-2,000 hours
- Use only AGCO-specified fluids like Permatran 821XL for your specific model
Annual Fluid Sampling
- Test for particle count and water content analysis
- This catches contamination before it scores motor internals
- Target ISO 4406 cleanliness of 18/16/13 or better for high-pressure hydrostatic drives
Case Drain Line Inspection
- Check at the start of each season for cracking, swelling, or restriction
- Blocked case drains cause pressure spikes that blow shaft seals
After Any Hydraulic System Work
- Flush and refill before returning to full operation
- This prevents introducing contamination into wheel motors
Beyond these maintenance tasks, keep a log of charge pressure readings at each wheel motor over time. A gradual decline at one motor is an early warning of developing internal wear — catching it early means a planned rebuild rather than a machine-down emergency during peak season.

Frequently Asked Questions
How do I know if my Rogator wheel motor is failing or if the problem is in the hydraulic pump?
A case drain flow test and charge pressure check at the individual wheel motor can isolate the problem. High case drain flow points to internal motor wear, while low charge pressure across all motors more likely indicates a failing charge pump, clogged suction filter, or low fluid level in the reservoir.
What causes a Rogator to pull to one side during operation?
Pulling to one side typically indicates unequal drive output, most commonly caused by a worn or bypassing wheel motor on the lagging side. It can also result from unequal tyre pressure or a hydraulic flow imbalance in the drive circuit, so check tyre pressures first before condemning a motor.
Can I rebuild a Rogator wheel motor myself, or does it require professional equipment?
External seal replacements are within reach of a skilled in-house technician with the right seal kit and service manual. Full internal rebuilds require precision measuring tools, contamination-controlled conditions, and dedicated test equipment to verify pressure and flow to manufacturer specs — work best suited to a professional rebuild shop.
How long should a Rogator wheel motor last?
With proper fluid maintenance and contamination control, wheel motors can last 3,000–5,000 operating hours or more. Contaminated hydraulic fluid is the leading cause of premature failure, often cutting service life by 50% or more.
What hydraulic fluid should I use in my Rogator's wheel motor circuit?
Refer to your Rogator operator manual for the specified fluid type and grade. AGCO typically specifies Permatran 821XL (10W-30) for RoGator C Series and RG Series chassis hydraulic systems. Using non-specified fluid can cause seal degradation, reduce viscosity protection, and shorten motor service life.
How much does it typically cost to repair or replace a Rogator wheel motor?
Repair costs vary by failure type. A seal kit repair with labor typically runs $300–$800, while a full internal rebuild or new motor ranges from $5,000–$12,000 depending on the motor model and displacement. Exchange and rebuild programs can offer a cost-effective middle ground ($4,000–$8,000) with faster turnaround than waiting for OEM parts and full dealer service.