Introduction
Kawasaki hydraulic pumps—particularly the K3V and K5V variable displacement piston pump series—power thousands of excavators, loaders, and industrial machines worldwide. These pumps automatically match flow and pressure to engine load through precision regulator systems.
When that calibration drifts, the entire machine suffers: sluggish boom response, stalled actuators under load, and accelerated wear on internal components.
Many operators delay adjustment, assuming the symptoms will resolve on their own — they won't. Misadjusted pumps force engines to overload or underperform, directly cutting productivity. Unplanned heavy equipment downtime costs between $500 and $20,000 per hour, and improper pump calibration is a leading cause.
This guide walks through the adjustment process from diagnosis to final verification, so you can restore performance before small calibration issues become expensive repairs.
Key Takeaways
- Kawasaki K3V and K5V pumps use lock nuts and adjustment screws to control flow and pressure at low and high settings.
- Slow operation, holding under load, and reduced output power signal adjustment is needed.
- Always loosen lock nuts before adjusting and turn screws in 1/4-turn increments only — verify engine response after each change before proceeding.
- Never exceed 2 full turns on any screw—exceeding this risks regulator damage.
- Persistent poor performance despite adjustment points to internal wear — at that point, a professional rebuild or exchange unit is the right call.
Why Proper Kawasaki Pump Adjustment Matters
Kawasaki variable displacement pumps use a regulator system to match output to engine load in real time. When this calibration drifts—due to vibration, wear, or incorrect prior service—the engine either lugs under excessive load or idles inefficiently, wasting fuel and time. Operators feel it immediately:
- Delayed boom response during lift cycles
- Weak bucket breakout force under load
- Inconsistent travel speed across terrain
Those symptoms carry a real price tag. Heavy equipment fleets lose 14% of annual operating hours to unplanned breakdowns, with downtime costs ranging from $500 to $20,000 per hour depending on equipment type. A misadjusted pump forces repeated manual corrections, shortens component life, and raises the risk of catastrophic failure during peak-demand periods.
Correct adjustment ensures the pump operates within manufacturer-specified parameters: 34.3 MPa (4,975 psi) continuous and 39.2 MPa (5,685 psi) peak pressure. Staying within these limits also protects warranty coverage: Kawasaki Precision Machinery explicitly excludes warranty claims if products are "altered, modified, or repaired except as may be agreed in writing".
Types of Kawasaki Hydraulic Pump Adjustments
Kawasaki K3V and K5V piston pumps feature several distinct adjustment points, each targeting a specific aspect of performance. Applying the wrong adjustment to the wrong symptom can shift the problem elsewhere — or create a new one.
Flow Adjustment (Maximum and Minimum)
Maximum flow is adjusted by loosening the regulator lock nut and turning the adjustment screw:
- Clockwise: Increases flow
- Counterclockwise: Decreases flow
Hard limit: Never exceed 2 full turns from the original set position to prevent over-displacement.
Minimum flow adjustment follows reverse logic: clockwise reduces flow, counterclockwise increases it. Observe engine power changes during adjustment to confirm correct calibration—engine speed should remain stable under load.
Pressure Adjustment (Low Pressure and High Pressure)
Low-Pressure Adjustment:
- Loosen the large lock nut (nut ①)
- Turn adjusting nut (②) inward in 1/4-turn increments to speed up slow low-pressure actions
- Turn outward to reduce holding pressure at low setting
- Re-tighten lock nut after each test
High-Pressure Adjustment:
- Loosen the small lock nut (③)
- Turn the square adjusting screw (④) inward in 1/4-turn increments to correct slow high-pressure actions
- Turn outward to reduce over-holding at high pressure
- Re-tighten small lock nut after each verified step
Variable Displacement (Swash Plate) Adjustment
For variable displacement Kawasaki pumps, the swash plate angle controls displacement output. Adjusting the servo piston mechanism changes cylinder block inclination to match load requirements.
Unlike flow or pressure adjustments, swash plate calibration requires:
- Pressure gauges installed at test ports
- A systematic test procedure to confirm pump output matches the target displacement curve
- Comparison against manufacturer specifications for your specific machine
Regulator / Engine Pulldown Adjustment
The regulator matches total pump load to engine capacity. Two spring-loaded cartridges control this:
- Outer spring (load-adjusting cartridge): Controls engine pulldown at medium pressure
- Inner spring (load-adjusting screw): Controls pulldown at high pressure
General procedure:
- Reset both cartridges (turn out 1–1/4 turns)
- Run engine at fast idle
- Actuate propel functions over relief
- Adjust each pump individually, turning the cartridge inward until engine speed just begins to drop (0–5 rpm range is the target)
- Match both pumps before making the final combined adjustment
Signs Your Kawasaki Pump Needs Adjustment
Before making any adjustment, identify the specific symptom to determine which adjustment type is required.
Slow or Weak Machine Operation
Low-pressure sluggishness (for example, boom raise, arm curl at idle speed) signals that the low-pressure regulator setting is too low. The pump is not providing enough flow to meet actuator demand.
High-pressure slowness (such as digging hard material under full load) indicates the high-pressure adjustment screw needs to be turned inward incrementally. Unlike low-pressure sluggishness, this symptom appears specifically under maximum load conditions.
Pump Holding / Stalling Under Load
When the excavator or machine freezes or stalls under load rather than pushing through, the pump pressure is set too high. The pump is trying to maintain more pressure than the circuit requires, causing the engine to lug.
Distinguish between:
- Low-pressure holding: Adjusted via large lock nut and nut ②
- High-pressure holding: Adjusted via small lock nut and square screw ④
Misidentifying the symptom leads to the wrong adjustment and worsens the problem.
Abnormal Noise, Heat, or Vibration
Unlike pressure-related symptoms, noise and heat point to physical pump condition. Cavitation noise (whining, grinding), excessive heat, or unusual vibration indicate the pump is operating outside its calibrated parameters: either under-pressured on the intake side or overloaded from excessive back pressure.
These symptoms may also signal underlying maintenance issues:
- Contaminated fluid
- Worn seals
- Clogged filters
Attempting to adjust a worn pump will not restore performance. Resolve maintenance issues before touching the adjustment screws.
Reduced Output or Inconsistent Performance
A pump that delivers inconsistent flow—where machine speed varies unpredictably under similar loads—may have a regulator that has drifted from its set point. Vibration-induced loosening decreases bearing and thread friction torque, causing lock nuts to self-loosen over hours of operation.
First diagnostic step: Verify that all lock nuts are tight before beginning adjustment. Self-loosened hardware is a common cause of gradual performance decline.
How to Adjust Your Kawasaki Hydraulic Pump Safely
Pre-Adjustment Requirements
Before touching any adjustment hardware:
- Warm up the hydraulic system to operating temperature
- Position the machine safely on level ground
- Engage safety locks
- Have the correct tools on hand (13mm and 30mm wrenches for regulator nuts, plus a pressure gauge)
- Verify system pressure has dropped to zero (OSHA 29 CFR 1910.147 lockout/tagout requirement)
Universal Adjustment Rule
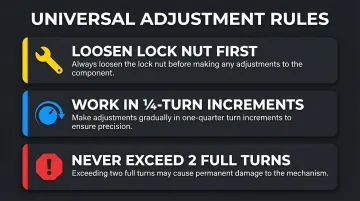
Three rules apply to every adjustment on these pumps:
- Loosen the lock nut first before touching the adjustment screw or cartridge
- Work in 1/4-turn increments for regulator screws, observing machine behavior between each step
- Never exceed 2 full turns from baseline — if the symptom hasn't resolved by then, the problem is mechanical, not a calibration issue
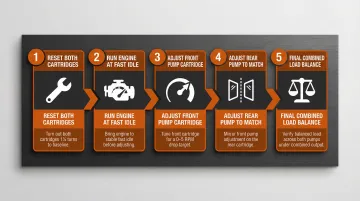
Dual-Pump Regulator System Adjustment Sequence
- Reset both load-adjusting cartridges — turn out 1–1/4 turns
- Run the engine at fast idle and actuate propel over relief
- Adjust the front pump cartridge — turn inward until engine speed just begins to drop (0–5 rpm)
- Repeat the same adjustment on the rear pump to match both outputs
- Make a final combined adjustment to balance total load
Verification Step
After each adjustment increment:
- Release the function
- Let the system stabilize briefly to prevent oil overheating
- Re-apply the function to confirm the adjustment held and the symptom is resolved
When to Stop and Call a Professional
Stop adjusting and contact a professional if:
- Adjustment does not resolve the symptom within 2 full turns
- Internal noise or leakage is present
- The machine deteriorates further after adjustment
These signs indicate internal component wear that adjustment alone cannot fix. Hydrostatic Transmission Service offers rebuild and exchange programs for pumps with mechanical failures beyond adjustment, backed by technicians who can walk you through the diagnosis before any work begins.
Kawasaki Pump Adjustment and Maintenance Schedule
Adjustment intervals depend on machine hours, operating intensity, and environment. High-duty-cycle machines running in abrasive or extreme-temperature conditions need more frequent checks than intermittent-use equipment. Use the schedule below as a baseline — adjust downward if your application runs hard.
| Frequency | Task | Notes |
|---|---|---|
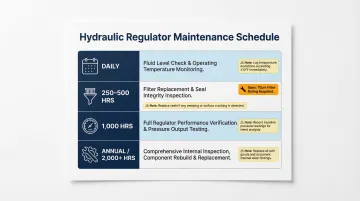
| Daily | Fluid level and temperature checks | Verify hydraulic oil is within operating range; check for visible leaks |
| Every 250–500 hours | Filter replacement and seal inspection | Replace return filter (10 µm); inspect suction strainer (80–150 mesh); check case drain pressure < 0.1 MPa (14.5 psi) |
| Every 1,000 hours | Full regulator performance verification | Pressure/flow testing against manufacturer specs; verify lock nut torque; check for vibration-induced drift |
| Annually or 2,000+ hours | Comprehensive internal inspection or professional rebuild evaluation | Assess internal wear on pistons, valve plates, bearings, and seals; determine if rebuild is required |
Skipping scheduled checks compounds wear — a drifting pressure setting that goes unnoticed at 500 hours can cause piston or valve plate damage by 1,000. When adjustment no longer holds calibration between service intervals, that's a reliable indicator of internal wear. At that point, a professional rebuild using tested, warranted components typically costs less than the downtime and secondary damage caused by running a failing pump.
Frequently Asked Questions
Why is my hydraulic pump not pumping enough pressure?
Low output pressure is typically caused by a misadjusted high-pressure regulator screw, a worn pressure relief valve, or insufficient hydraulic fluid. Check fluid level and filter condition before attempting any pressure adjustment.
How to tell if your hydraulic pump is going bad?
Watch for these warning signs:
- Unusual whining or grinding noise during operation
- Slow or weak actuator response
- Abnormal heat buildup
- Visible external leaks
- Increased fuel consumption
These symptoms point to internal wear and may require a rebuild rather than adjustment.
What is the most common cause of hydraulic pump failure?
Contaminated hydraulic fluid is the leading cause — abrasive particles accelerate wear on pistons, valve plates, and bearings. Aeration and cavitation from low fluid levels, and running beyond rated pressure, are the next most common culprits.
What is the maximum discharge pressure for a pump?
Maximum rated discharge pressure varies by Kawasaki model series (K3V, K5V). Check the pump's datasheet or service manual for your specific model. Exceeding rated pressure accelerates wear and risks seal and housing failure.
What is the average PSI for hydraulics?
Industrial hydraulic systems on excavators typically operate between 3,000 and 5,000 PSI (approximately 200–350 bar). Kawasaki pump systems are designed for peak pressures in this range, depending on the machine class.
What do P and T mean on a hydraulic pump?
"P" designates the pressure port (outlet where high-pressure fluid exits) and "T" designates the tank/return port (where low-pressure return fluid flows back to the reservoir). Confirm which port is which before any adjustment or service work — swapping them causes immediate system damage.